Key takeaways
- USB is fast to install. Connect the microphone, select it in your streaming software, and begin. A first-time setup can take less than 10 minutes, excluding boom-arm assembly and software configuration.
- USB costs less at the entry level. A capable USB microphone commonly falls in the $40 to $150 range. You do not need a separate $70-to-$180 interface or an additional XLR cable.
- USB is portable. It is practical for moving between a desktop, laptop, gaming room, and temporary recording location. The entire audio chain can fit in a small bag.
- XLR scales better. An interface can support one or more microphones, instrument inputs, monitor speakers, and hardware controls. Replacing the microphone does not require replacing the interface.
- XLR offers hands-on control. Interfaces typically provide a large gain knob, headphone volume, mute functions, and input meters. That can be more convenient while streaming than reaching for software controls.
- XLR can simplify multi-person audio. If you regularly host a local co-streamer or podcast guest, an interface with two or more microphone inputs is usually more suitable than trying to connect several USB microphones.
- Hybrid microphones protect your options. A USB/XLR model lets a beginner start directly from the computer and move to an interface later. This is often the best compromise for someone uncertain about long-term streaming plans.
- Both formats can sound professional. A properly placed dynamic microphone, a consistent distance of about 4 to 8 inches, and basic noise control can matter more than choosing XLR over USB.
What's inside
The Short Answer
Choose USB if you want the simplest, lowest-cost path to a good streaming microphone; choose XLR if you are willing to buy and manage an audio interface for better upgrade flexibility. The deciding condition is whether you expect to add equipment—such as a second microphone, hardware processing, studio monitors, or a more advanced streaming setup—within the next few years.
For most first-time streamers, USB is the sensible starting point. A USB microphone connects directly to a computer, usually includes a headphone jack for monitoring, and avoids the extra boxes, cables, gain controls, and troubleshooting that come with XLR. XLR is not automatically better-sounding, either. The microphone, room, placement, voice, and settings often matter more than the connector.
As an Amazon Associate we earn from qualifying purchases at no extra cost to you. Product prices and availability are accurate as of the date shown and are subject to change.

What You Actually Get
A USB microphone contains both the microphone capsule and a small audio interface. It converts your voice to digital audio inside the microphone, then sends that signal to your computer over USB. Many models include a mute button, volume control, headphone output, and a basic monitoring mix. The setup typically requires one USB cable, a stand or boom arm, and software such as OBS or your preferred video-call application.
An XLR setup separates those jobs. You buy an XLR microphone, an audio interface, an XLR cable, and a stand or boom arm. The microphone sends an analog signal through the cable, while the interface supplies preamp gain, converts the signal to digital audio, and connects to your computer by USB. A basic one-microphone setup commonly costs about $120 to $250 when all parts are included. More polished combinations can reach $300 to $500 or more.
The difference is also physical. A USB microphone often occupies a single USB port and may weigh roughly 1 to 2 pounds before its stand. An interface adds another desktop device, often around 5 to 8 inches wide, plus a power or USB connection. You may also need headphones with a 3.5-millimeter plug, since monitoring through computer speakers introduces distracting delay and can create feedback.
Power is rarely a serious concern for either option. USB microphones draw power from the computer, usually only a few watts. Most audio interfaces also run from USB and use modest power, while larger interfaces may use an external adapter. XLR condenser microphones require 48-volt phantom power from the interface; dynamic microphones generally do not. A dynamic microphone is often easier in untreated rooms because it rejects more surrounding sound, although placement still matters.
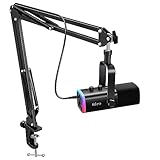
A useful middle ground is a microphone with both USB and XLR outputs. The FIFINE AmpliGame AM8, listed at $56.99, can work as a direct USB microphone now and later feed an interface through XLR. The FIFINE AmpliGame AM8T set, listed at $67.99, packages the microphone with additional mounting equipment. These are examples of the hybrid category rather than proof that every USB/XLR model performs identically.
Pros
- USB is fast to install. Connect the microphone, select it in your streaming software, and begin. A first-time setup can take less than 10 minutes, excluding boom-arm assembly and software configuration.
- USB costs less at the entry level. A capable USB microphone commonly falls in the $40 to $150 range. You do not need a separate $70-to-$180 interface or an additional XLR cable.
- USB is portable. It is practical for moving between a desktop, laptop, gaming room, and temporary recording location. The entire audio chain can fit in a small bag.
- XLR scales better. An interface can support one or more microphones, instrument inputs, monitor speakers, and hardware controls. Replacing the microphone does not require replacing the interface.
- XLR offers hands-on control. Interfaces typically provide a large gain knob, headphone volume, mute functions, and input meters. That can be more convenient while streaming than reaching for software controls.
- XLR can simplify multi-person audio. If you regularly host a local co-streamer or podcast guest, an interface with two or more microphone inputs is usually more suitable than trying to connect several USB microphones.
- Hybrid microphones protect your options. A USB/XLR model lets a beginner start directly from the computer and move to an interface later. This is often the best compromise for someone uncertain about long-term streaming plans.
- Both formats can sound professional. A properly placed dynamic microphone, a consistent distance of about 4 to 8 inches, and basic noise control can matter more than choosing XLR over USB.
Cons
- USB can become limiting. Many USB microphones are designed for one computer and one speaker. They are less convenient when you want multiple microphones, external processing, or a permanent studio-style signal path.
- USB relies on computer software. Driver conflicts, application permissions, operating-system updates, and incorrect input selection can interrupt a broadcast. The setup is easy, but it is not completely foolproof.
- XLR costs more. After buying a microphone, interface, cable, and mount, the initial price can be two to four times higher than a basic USB package.
- XLR takes more space. The interface needs a place on the desk, and cable management becomes part of the setup. A boom arm, interface, headphones, and monitor speakers can quickly make a small desk feel crowded.
- Gain staging takes learning. Too little gain creates a quiet signal; too much creates clipping and distortion. Streamers also need to set software filters, monitor volume, and possibly phantom power correctly.
- XLR does not guarantee better sound. An inexpensive XLR microphone in a reflective room can sound worse than a well-positioned USB microphone. Echo, keyboard noise, air conditioning, and an inconsistent speaking distance remain problems.
- USB microphones can consume a valuable port. Some laptops have only two or three USB ports, and a microphone may compete with a webcam, external drive, capture device, or wireless receiver.
- Hybrid models have compromises. A USB/XLR microphone is flexible, but its built-in USB electronics, controls, and included accessories may not match the performance or construction of dedicated equipment at a higher price.
Who Should Buy It
Buy a USB microphone if you stream alone, use one computer, want to spend about $50 to $150, and value a quick setup. It is the right choice for gaming, Twitch-style commentary, video calls, voice-over practice, and casual podcasting. It is also appropriate if your desk is small or you frequently move your setup.
Buy an XLR setup if you already own an interface, plan to record multiple people, want physical controls, or expect your audio system to grow. XLR makes particular sense for a dedicated streaming room, regular podcast production, music recording, or anyone who wants to replace individual components over time.
Buy a USB/XLR microphone if you want to begin inexpensively but do not want to close the door on an interface. A model such as the $56.99 FIFINE AmpliGame AM8 or the $67.99 AM8T set can serve as a starter path, provided its sound, mounting arrangement, and controls meet your needs.
Who Should Skip It
Skip a basic USB microphone if you already know you will need two or more microphones, external hardware processing, or several headphone feeds. Buying USB first and replacing it soon afterward may cost more than starting with an interface and XLR microphone.
Skip XLR if you dislike technical setup, have no room for an interface, or are choosing it only because you assume the label means “professional.” If your room is noisy or echo-prone, spend part of the budget on positioning, curtains, rugs, and a boom arm before upgrading connectors. A premium interface cannot remove every acoustic problem.
Cheaper Alternatives
| Option | Cost | Trade-off |
|---|---|---|
| Entry-level USB dynamic microphone | $30–$70 | Lowest total cost, but often fewer controls, a basic stand, and less flexible mounting. |
| USB/XLR hybrid microphone | $55–$120 | Provides an upgrade path, though its USB monitoring and included accessories may be basic. |
| Used USB microphone from a major brand | $40–$100 | Can offer better construction for the money; inspect the USB port, mute button, and capsule for wear. |
| Used XLR microphone plus entry interface | $90–$180 | More expandable than USB, but used equipment may lack a warranty and require extra cables. |
| Headset microphone | $25–$100 | Fastest and most space-saving option, but usually less natural-sounding and more sensitive to headset placement. |
FAQ
Is XLR better than USB for streaming?
Not by default. XLR offers more expansion and hands-on control, while USB offers simpler installation and lower cost. A well-positioned USB dynamic microphone can sound excellent, especially in a normal bedroom or gaming room. XLR becomes the better choice when you need multiple inputs or plan to build a larger audio system.
Do I need an audio interface for an XLR microphone?
Yes. An XLR microphone needs a device with a compatible microphone preamp and digital connection, such as an audio interface, mixer, or streaming console. You will also need an XLR cable. Budget about $50 to $150 for a basic one-input interface and roughly $10 to $30 for a cable.
Should streamers use dynamic or condenser microphones?
Dynamic microphones are usually easier in untreated rooms because they tend to pick up less distant room sound. Condenser microphones can capture more detail but may also capture keyboards, fans, air conditioning, and reflections. Neither type is universally best; choose based on your room, speaking distance, and background noise.
Can I start with USB and switch to XLR later?
Yes, if you buy a hybrid microphone with both outputs. You can use USB initially, then connect the same microphone to an interface through XLR. Check that the model supports simultaneous monitoring and that the required cable is included or budget another $10 to $30. For most new streamers in 2026, this is the safest way to preserve flexibility without paying for a full XLR setup immediately.