Key takeaways
- Supported diameter: The microphone should sit near the middle of the stated range, not at an extreme edge.
- Usable gripping length: Allow at least 1.5–2 inches of stable contact when possible.
- Clearance: Make sure the mount does not cover a power switch, connector, control, or grille vents.
- Weight capacity: Look for a stated rating. If there is no rating, choose a mount with visibly robust hardware and keep a safety margin of at least 25 percent.
What's inside
Heavy dynamic microphones create a different mounting problem than lightweight condensers. A standard spring clip may hold a microphone securely, yet still transfer desk bumps, stand movement, cable tugging, and floor vibration straight into the recording. The wrong shock mount can also squeeze the microphone body, block switches, add unwanted handling noise, or sag during a long session.
That is why “how to choose shock mount for heavy dynamic microphones” is not simply a search for the softest suspension. You need to match the mount to the microphone’s diameter, weight, body shape, stand hardware, and intended use. In 2026, the best value is often a correctly sized, simple mount—not necessarily the most elaborate universal model.
As an Amazon Associate we earn from qualifying purchases at no extra cost to you. Product prices and availability are accurate as of the date shown and are subject to change.


Decide These 3 Things First
- Measure the microphone. Check the widest cylindrical section, not just the grille. Most vocal dynamics fall around 22–26 mm, while larger broadcast-style bodies may measure roughly 47–53 mm.
- Confirm the microphone’s weight. Include the cable if the cable hangs from the mount. A microphone weighing 10–14 ounces needs less support than a broadcast dynamic weighing 20–30 ounces.
- Identify the mounting thread and use. Most microphone stands use a 5/8-inch-27 thread, often with a 3/8-inch adapter. A desk boom, floor stand, and camera-style arm may each need different hardware or clearance.
If you cannot find reliable measurements, measure the microphone with a ruler or soft tape and weigh it on a kitchen scale. Two minutes of measuring can prevent a loose fit or a mount that cannot support the microphone’s leverage.
Size and Compatibility
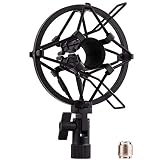
Size is the first decisive factor. A mount designed for a 22–26 mm body may suit microphones such as the Shure SM58, SM57, Sennheiser E835, AKG D5, Samson Q7, and similar handheld dynamics. These mounts usually grip a narrow section of the microphone body with a rubber or polymer sleeve.
A larger universal mount in the 47–53 mm range is better suited to thick broadcast-style microphones. For example, the Boseen Universal Microphone Shock Mount is marketed for this larger diameter range. It is not automatically a better choice for an SM58-sized microphone; an oversized cradle can allow rotation, contact noise, or a gradual slide.
Check four measurements before buying:
- Supported diameter: The microphone should sit near the middle of the stated range, not at an extreme edge.
- Usable gripping length: Allow at least 1.5–2 inches of stable contact when possible.
- Clearance: Make sure the mount does not cover a power switch, connector, control, or grille vents.
- Weight capacity: Look for a stated rating. If there is no rating, choose a mount with visibly robust hardware and keep a safety margin of at least 25 percent.
Material and Padding
The gripping material determines both security and noise isolation. Rubber and silicone-like sleeves provide friction while helping absorb small vibrations. Hard plastic clips are light and inexpensive, but they can transmit more impact and may develop stress cracks if repeatedly flexed.
For a heavy dynamic microphone, look for padding approximately 1/8 to 1/4 inch thick where the microphone contacts the mount. Thicker is not always better: excessive padding can reduce grip and allow the body to sway. The ideal material should compress slightly when the microphone is inserted, then return to its shape without leaving permanent gaps.
Metal frames are generally preferable for the structural portion of a heavy-duty mount. A steel or aluminum frame can resist twisting better than a thin all-plastic body. However, metal alone does not guarantee quiet operation. The elastic bands, contact pads, and mounting joint do most of the vibration-isolation work.
For a handheld vocal dynamic used on a desk or boom arm, a rubber-lined clip may be sufficient. For a broadcast microphone mounted close to a keyboard, computer fan, or moving boom, a suspended design with replaceable bands is usually more forgiving.
Construction and Load Handling
Heavy microphones exert leverage, especially when they extend horizontally from a boom arm. A mount that feels solid with the microphone pointing upward may sag when the microphone is angled 45 or 90 degrees.
Examine the joint connecting the mount to the stand adapter. A broad tightening knob, metal thread insert, and a joint that locks without excessive force are useful signs. Avoid a mount whose entire weight hangs from a narrow plastic neck. For a microphone around 1 pound, choose hardware that does not visibly flex when the microphone is rotated.
Suspension bands should be evenly tensioned and should not twist out of their channels. If the bands are removable, replacements are a meaningful advantage because elastic materials eventually stretch. A mount with four separate contact points is often more stable than one relying on a single thin ring, although design quality matters more than the raw number of bands.
Also consider cable strain. A thick XLR cable can pull downward with several ounces of force. Leave a loose cable loop and secure the cable to the stand below the mount. This reduces both sag and vibration transfer.
Comfort and Performance
“Performance” should mean fewer unwanted mechanical noises, not a promise of a specific decibel reduction. Shock mounts are most useful against structure-borne vibration: desk taps, stand bumps, floor movement, and cable handling. They will not eliminate room noise, computer fans, plosives, or sound traveling through the air.
For spoken-word recording, place the mount where you can adjust the microphone without touching the grille. A smooth tilt mechanism is valuable when several speakers use the same setup. The mount should hold its angle without requiring a wrench, but it should not be so loose that the microphone gradually droops.
Check access to the microphone connector. Leave enough room to insert and remove the XLR plug without forcing the cable sideways. A mount that presses against the connector can damage the cable or make routine setup frustrating.
For stage or rehearsal use, prioritize retention over maximum isolation. A compact clip that locks the microphone firmly may be safer than a delicate elastic cradle. For a permanent studio setup, replaceable suspension bands and a wider adjustment range are more valuable.
Price Tiers
Budget mounts typically cost about $7 to $16. Examples include the SUNMON SM58-style mount at about $7.99, the LYRCRO 22–26 mm holder at about $10.99, and the OnStage MY325 at about $15.95. These products can be sensible choices for standard-size dynamic microphones when their diameter and mounting thread match.
At this price, inspect the fit carefully and expect simpler materials, fewer adjustments, and limited replacement parts. A budget mount is appropriate for a home vocal setup, podcast backup system, or light-duty boom arm.
Midrange options generally fall around $17 to $45. They may offer better metal hardware, more consistent padding, replaceable bands, smoother adjustment, or a wider supported weight range. This tier is often the practical sweet spot for a heavy dynamic used several times per week.
Premium mounts commonly cost $46 to $100 or more. You are paying for refined suspension, durable elastics, stronger joints, interchangeable fittings, and better long-term support—not necessarily a dramatic improvement in recorded sound. If the microphone is already isolated from desk and floor vibration, spending more may produce little audible benefit.
Warranty and Replacement Support
A warranty matters most when the mount contains elastic bands, moving joints, or a thin plastic clip. Look for at least a 12-month warranty for regular home use. A two-year warranty is preferable for a frequently adjusted studio mount, provided the manufacturer clearly covers defects rather than normal wear.
Replacement bands should be available or at least a standard size that can be sourced later. If the mount is unusable when one elastic loop breaks, its effective lifespan may be short. Keep the product packaging and order information until you have installed the mount and tested it under load.
Warranty language should also clarify whether the stated load limit applies to vertical mounting only. A microphone rated for 2 pounds vertically may not be safe when extended horizontally from a boom arm.
Delivery and Assembly
Before ordering, verify what is included: shock mount, stand adapter, thread converter, spare bands, and installation instructions. Some mounts arrive with a 5/8-inch-27 connection; others include a 3/8-inch adapter. If your arm uses a different thread, you may need an additional adapter.
Assembly should take roughly 5–15 minutes without tools beyond a small wrench, if any. After installation, insert the microphone, tighten the joint, and leave it in the intended position for 30 minutes. Check whether the body rotates, the bands stretch unevenly, or the mount slowly drops.
For delivery, inspect the package for bent metal, cracked plastic, missing screws, and flattened padding. A return window of at least 30 days is useful because compatibility problems often become obvious only after the microphone is installed.
Spec Checklist
| Spec | Budget | Mid | Premium |
|---|---|---|---|
| Typical price | $7–$16 | $17–$45 | $46–$100+ |
| Common microphone diameter | 22–26 mm or one fixed size | 22–53 mm, adjustable options | Broad, precisely adjustable range |
| Suitable microphone weight | Up to about 14 oz | About 14–28 oz | 28 oz and above, if specifically rated |
| Frame | Plastic or thin metal | Reinforced plastic or metal | Rigid metal with replaceable parts |
| Adjustment | Fixed or limited tilt | Locking tilt and adapter | Multiple fittings and smooth locking joints |
| Warranty target | 90 days to 1 year | 1–2 years | 2 years or longer |
Red Flags
- No supported diameter or weight information.
- A universal claim that lists many microphones but gives no measurements.
- Padding that slips, sheds, or leaves a large gap around the microphone.
- A joint that tilts under the microphone’s weight before the knob is fully tightened.
- Thin elastic bands with no replacement option.
- A mount that blocks the XLR connector or requires bending the cable sharply.
- Reviews describing sagging, cracked clips, or microphones falling during adjustment.
- Hardware that arrives without the thread adapter required by your stand.
FAQ
Do heavy dynamic microphones always need a shock mount?
No. A properly fitted microphone clip can be adequate for a floor stand or quiet desk setup. A shock mount becomes more useful when the microphone is on a boom arm, near a keyboard, or exposed to desk and stand bumps.
Can a shock mount make a microphone sound better?
It does not change the microphone’s frequency response by itself. It can make recordings cleaner by reducing mechanical vibration that would otherwise become low-frequency thumps or handling noise.
Is a universal shock mount better than a model-specific mount?
Only when it adjusts securely around your microphone. A model-specific 22–26 mm mount may hold an SM58-style microphone more reliably than a large universal cradle. Universal designs are most useful when you own several microphones with different body diameters.
How tight should the mount be?
The microphone should stay in place when the mount is tilted, but the padding should not visibly crush the body. After tightening, gently rotate and lower the microphone. If it slips, choose a better-fitting mount rather than forcing the adjustment knob.