Key takeaways
- Using the capture card’s HDMI OUT as the input. Always follow the printed IN and OUT labels.
- Testing through a cheap hub first. Connect directly to the computer before adding hubs, extenders, or adapters.
- Forcing 4K, HDR, or 120 Hz on a basic card. Begin at 1080p/60 SDR, then increase settings only after the feed is stable.
- Leaving another camera app open. Close video-call apps and browser tabs that may have claimed the device.
- Assuming pass-through equals capture capability. A card may pass a higher-resolution signal to a TV while recording only 1080p or 720p.
- Ignoring HDMI cable condition. Replace kinked, overly long, or loose cables. For a desktop setup, a 3- to 6-foot cable is usually easier to manage and troubleshoot than a 15-foot run.
An OBS capture card black screen or “No Signal” message usually comes down to one of four issues: the wrong HDMI path, insufficient USB bandwidth, an OBS source setting mismatch, or a console/camera output setting the capture card cannot accept. If you troubleshoot in the wrong order, it is easy to spend an hour changing OBS filters when the real problem is a loose HDMI cable or a USB 2.0 port.
The good news is that most capture-card signal problems can be fixed without replacing your computer or rebuilding your streaming setup. Work through the checks below in order, starting with the physical connection and ending with OBS settings. This process applies to common USB HDMI capture cards used with cameras, Nintendo Switch, Xbox, PlayStation consoles, and a second PC.
As an Amazon Associate we earn from qualifying purchases at no extra cost to you. Product prices and availability are accurate as of the date shown and are subject to change.
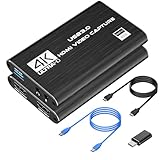
![VIXLW 4K HDMI Video Capture Card, Cam Link Card, HDMI to USB 2.0 Game Audio Adapter, Record Capture Device for Streaming, Teaching, Gaming, Live Broadcasting, Video Conference [Windows]](https://m.media-amazon.com/images/I/41e6jd88Y4L._SL160_.jpg)
What You Need
| Item | Why | Optional? |
|---|---|---|
| Computer running OBS Studio | Lets you test whether the capture device is recognized and receiving video. | No |
| USB capture card | Converts an HDMI video signal into a USB video source for OBS. Basic USB 2.0 HDMI adapters often cost about $8 to $15; USB 3.0 1080p/60 capture cards commonly run about $20 to $40. | No |
| HDMI cable, 3 to 6 feet | Connects the console, camera, or computer to the capture card. A known-working cable rules out a common failure point. | No |
| USB 3.0 port or powered USB 3.0 hub | Many 1080p/60 cards need the bandwidth and power available from USB 3.0. USB 3.0 ports are often blue or marked “SS.” | Usually |
| Second HDMI cable and display | Useful for testing HDMI pass-through and confirming that the source device is actually outputting video. | Yes |
| Small flashlight or phone light | Helps inspect HDMI and USB ports for bent contacts, lint, or a partially inserted plug. | Yes |
Step-by-Step
1. Confirm the HDMI signal is flowing in the correct direction (5 minutes)
Start with the basic connection layout. The HDMI cable must run from the source device’s HDMI OUT port to the capture card’s HDMI IN port. A frequent mistake is connecting to an HDMI OUT port on both devices or confusing the pass-through port with the input port.
For a console setup, the path should be: console HDMI OUT → capture card HDMI IN → USB cable → streaming computer. If your card has HDMI pass-through, connect the display to the card’s HDMI OUT port.
For a camera, use its clean HDMI output if available. Turn the camera on before opening OBS, and make sure it is not set to USB webcam mode. For a laptop or desktop source, verify that its HDMI port is an output; most computers do not accept HDMI input through their standard HDMI port.
Push each connector in firmly. HDMI plugs should sit straight and nearly flush with the port opening. If a plug feels loose, test with another cable before assuming the capture card has failed.
2. Restart the source, capture card, and OBS in the right order (5 minutes)
USB capture cards can occasionally fail their initial HDMI handshake, particularly after a computer wakes from sleep or a console changes resolution. Shut down OBS completely. Unplug the capture card’s USB connection, wait 15 seconds, then reconnect it directly to the computer.
Next, power on the source device and let it reach its home screen or camera preview. Wait another 10 seconds, then open OBS. This order gives the card time to detect the incoming resolution before OBS requests the video feed.
If the capture card has HDMI pass-through, check the connected TV or monitor. A picture on the pass-through display but a black image in OBS usually indicates a USB, driver, or OBS configuration issue. No image on either display points more strongly to the HDMI cable, source output, HDCP, or capture card input.
3. Move the card to a direct USB 3.0 connection (5 to 10 minutes)
Disconnect the card from unpowered hubs, keyboard USB ports, front-panel ports, and docking stations during testing. Plug it directly into a USB 3.0 port on the streaming computer. A USB 3.0 capture card may display a black screen, freeze, or fall back to a lower frame rate when connected through a USB 2.0 connection.
Not every low-cost capture card requires USB 3.0. Some HDMI-to-USB 2.0 adapters are designed for 720p or 1080p at lower frame rates. However, a card advertised for Full HD 1080p at 60 fps should be treated as a USB 3.0 device unless its instructions specifically state otherwise.
If you need more ports, use a powered USB 3.0 hub with its own wall adapter rather than a slim bus-powered hub. Also avoid sharing the hub with high-bandwidth devices such as external SSDs, webcams, and another capture card.
4. Check whether the operating system can see the capture device (5 minutes)
Before adjusting OBS, confirm that the computer recognizes the card. On Windows, open Device Manager and look under Cameras, Sound, video and game controllers, or Universal Serial Bus devices. Many generic cards appear as “USB Video,” “USB Camera,” “HDMI Video Capture,” or similar names rather than the product name.
If it does not appear, try another USB port and restart the computer. Test the capture card on a second computer if possible. If it works on another computer, the issue is likely with the original computer’s USB port, driver, power management, or software conflict.
Close other programs that may be holding the card open, including Zoom, Teams, Discord, browser video-call tabs, camera utilities, and video-editing software. Many inexpensive USB capture devices can be accessed by only one application at a time.
5. Add or reset the Video Capture Device source in OBS (5 to 10 minutes)
In OBS, go to the Sources panel, click the plus sign, and select Video Capture Device. Create a new source rather than reusing an old source at first. In the Device drop-down menu, select the capture card.
If OBS shows a black preview, click Deactivate, wait a few seconds, then click Activate. If that does not work, remove the source and add it again. Do not use Display Capture or Window Capture for an HDMI capture card; those source types record your streaming computer’s screen, not the incoming HDMI feed.
For most cards, begin with Resolution/FPS Type: Device Default. Once you have an image, you can set a custom resolution and frame rate. Start with 1920 × 1080 at 30 fps if you are unsure of the card’s limits. Then try 1920 × 1080 at 60 fps only if both the source and card support it.
6. Match the source device’s resolution and refresh rate (10 minutes)
A capture card can show “No Signal” if the source is sending a format outside the card’s supported input range. Set the source to a standard format first: 1920 × 1080 resolution, 60 Hz refresh rate, SDR color, and stereo audio.
For consoles, temporarily disable 4K output, 120 Hz mode, VRR, HDR, and automatic resolution detection. Some budget capture cards accept a 4K HDMI input but only capture 1080p, while others cannot interpret 4K, HDR, or high-refresh signals at all. “4K” on the package may refer to HDMI pass-through or supported input, not 4K recording.
For cameras, set HDMI output to 1080p and disable unusual output modes such as 4K 60p, RAW HDMI, or cinema frame rates during testing. For a computer source, choose 1920 × 1080 at 60 Hz in its display settings and turn off HDR temporarily.
7. Disable HDCP or protected-content playback (5 minutes)
HDCP is copy protection sent over HDMI. Capture cards generally cannot record protected content, and OBS may show a black screen when HDCP is active. On a PlayStation console, turn off HDCP in the system HDMI settings before attempting to capture gameplay.
Streaming apps, movie discs, and many paid video services may still produce a black screen even after other settings are correct. That is expected behavior for protected content. Test with a game menu, camera view, desktop, or other non-protected material instead.
8. Set the correct audio source after video returns (5 minutes)
Once the picture appears, check audio in OBS’s Audio Mixer. Many capture cards send sound through the same Video Capture Device source. Open the source’s properties and make sure audio output is enabled if your OBS version provides that option.
If video works but audio does not, set the console or camera output to stereo PCM rather than Dolby, DTS, or bitstream audio. Then add the card as an Audio Input Capture source only if OBS does not automatically receive its audio.
Mistakes to Avoid
- Using the capture card’s HDMI OUT as the input. Always follow the printed IN and OUT labels.
- Testing through a cheap hub first. Connect directly to the computer before adding hubs, extenders, or adapters.
- Forcing 4K, HDR, or 120 Hz on a basic card. Begin at 1080p/60 SDR, then increase settings only after the feed is stable.
- Leaving another camera app open. Close video-call apps and browser tabs that may have claimed the device.
- Assuming pass-through equals capture capability. A card may pass a higher-resolution signal to a TV while recording only 1080p or 720p.
- Ignoring HDMI cable condition. Replace kinked, overly long, or loose cables. For a desktop setup, a 3- to 6-foot cable is usually easier to manage and troubleshoot than a 15-foot run.
How Often
You should not need to repeat the full setup every time you stream. Check cables and confirm the OBS source before each session, especially if you move equipment. Perform a deeper test every 3 to 6 months: inspect ports, test a spare HDMI cable, update OBS, and verify that the capture card still works at your preferred resolution and frame rate.
Repeat the full troubleshooting sequence after a major operating-system update, a graphics-driver update, a power outage, or any time you add a new dock, hub, monitor, or console display setting.
When to Call a Pro or Replace
Replace the HDMI cable first if it is visibly damaged or fails with another device. Replace the capture card when it is not detected on two different computers with two known-good USB ports and two known-good HDMI cables. Also consider replacement if the USB connector is loose, the card becomes unusually hot, the image repeatedly drops out at supported settings, or it produces corrupted video after basic troubleshooting.
Entry-level replacements are relatively inexpensive: simple USB 2.0 HDMI capture adapters may cost $8 to $15, while USB 3.0 models marketed for 1080p at 60 fps commonly cost $20 to $40. If you need dependable 4K capture, HDR workflows, multiple HDMI inputs, or professional event streaming, consult an AV technician or choose a higher-spec capture solution rather than forcing a basic adapter beyond its limits.
FAQ
Why does my capture card show up in OBS but display a black screen?
OBS can recognize the USB device even when no usable HDMI signal is reaching it. Check that the source is connected to HDMI IN, lower the source to 1080p/60 SDR, disable HDCP, and reset the OBS Video Capture Device source. Also make sure no other application is using the card.
Why does OBS say “No Signal” after my console switches to 4K?
The console may be outputting a format your card cannot accept, such as 4K at 60 Hz with HDR, VRR, or 120 Hz enabled. Set the console to 1080p at 60 Hz, turn off HDR and VRR temporarily, and test again. Once stable, add features back one at a time if your card supports them.
Can I use a USB 2.0 capture card for 1080p streaming?
Yes, but confirm the card’s stated limits. Many USB 2.0 cards are best suited to 720p or 1080p at 30 fps. A USB 3.0 card is generally the better choice for 1080p at 60 fps because it has more available bandwidth.
Do I need to install a driver for a generic HDMI capture card?
Many generic USB capture cards use standard UVC video support and work without a separate driver. If the device is not recognized, check the manufacturer’s instructions, reconnect it directly to a USB port, restart the computer, and test it on another system before installing third-party driver files.