Key takeaways
- Motherboard first, outside the case: install the CPU, then the RAM, then the M.2 SSD, and finally the CPU cooler while the board is still on its box. Everything is more accessible before it goes in the case.
- Mount the power supply and route cables: a modular PSU lets you connect only the cables you need, which keeps airflow clean and the build tidy.
- Drop the motherboard into the case: line it up with the standoffs and the rear I/O shield, then secure it.
- Install the GPU last: it is the largest component and installing it early only blocks access to everything else.
What's inside
- Watch: How to Build a Gaming PC (2026 Beginner’s Guide) — Video Review
- Plan Your Parts List Before You Buy Anything
- Prepare Your Workspace and Tools
- Assemble in the Right Order
- Cable Management and Airflow
- First Boot and Testing
- Tips
- Related Guides
- Frequently Asked Questions
- Conclusion
- Related Articles
- Related Guides
Building your own gaming PC in 2026 is one of the most rewarding projects a PC gamer can take on. You end up with a machine tuned exactly to the games you play, you understand every component inside it, and you save the assembly markup that prebuilt vendors bake into their prices. Just as importantly, a hand-built rig is far easier to upgrade later, because you already know what socket, power headroom, and clearance you are working with. The barrier to entry has never been lower: modern motherboards guide you through POST errors with diagnostic lights, cables are keyed so they only fit one way, and the community has documented nearly every quirk you might hit.
- Watch: How to Build a Gaming PC (2026 Beginner’s Guide) — Video Review
- Plan Your Parts List Before You Buy Anything
- Prepare Your Workspace and Tools
- Assemble in the Right Order
- Cable Management and Airflow
- First Boot and Testing
- Tips
- Related Guides
- Frequently Asked Questions
- Conclusion
- Related Articles
- Related Guides
This guide walks you through the whole journey, from choosing parts that actually work together to the first time you press the power button and see your BIOS load. You will learn how to sequence the build so you are not fighting yourself, which steps trip up first-timers most often, and how to test the system before you commit to closing the case. If you decide partway through that you would rather skip the assembly, we have also lined up a few strong prebuilt options that give you similar performance without the screwdriver.
As an Amazon Associate we earn from qualifying purchases at no extra cost to you. Product prices and availability are accurate as of the date shown and are subject to change.


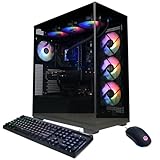


The machines above are our recommended picks for readers who want the performance of a modern build without sourcing parts individually. A configuration like the KOTIN Gaming PC Desktop with a Ryzen 7 9800X3D and RTX 5070 12GB mirrors the kind of balanced 1440p system most people building today are aiming for, while the Alienware Aurora with an Intel Core Ultra 7 265F and the CyberPowerPC Gamer Xtreme VR (Core i9-14900KF, RTX 5070) show what mainstream and higher-tier prebuilts look like in 2026. Use them as a benchmark for the parts list you assemble yourself.
⚡ Save on Your Next PC — Amazon Prime
Prime members get fast free shipping on the systems above, plus early access to Prime Day & Black Friday PC deals. New members get a 30-day free trial.
Watch: How to Build a Gaming PC (2026 Beginner’s Guide) — Video Review
Plan Your Parts List Before You Buy Anything
A successful build starts on a spreadsheet, not at the workbench. Decide your target resolution and refresh rate first, because that single choice drives every other component. A 1080p high-refresh esports rig has very different needs from a 4K single-player showcase machine. Once you know the goal, pick the GPU that hits it, then choose a CPU that will not bottleneck that GPU, then a motherboard with the correct socket, then RAM the board supports, and finally storage. Verify compatibility as you go: CPU socket must match the motherboard, RAM must be on the board’s supported list, and the case must physically fit both the GPU length and the CPU cooler height.
Prepare Your Workspace and Tools
You need surprisingly little to build a PC, but working clean saves hours of frustration. Clear a large, well-lit table and keep the motherboard box nearby to use as a non-conductive work surface for the initial CPU, RAM, and cooler installation. A single Phillips #2 screwdriver handles almost every screw in a modern case. Keep the small parts bags that ship with the motherboard and case organised, because standoffs, M.2 screws, and case fasteners are easy to lose. Ground yourself by touching the bare metal of the case or power supply chassis before handling components to discharge static.
Assemble in the Right Order
- Motherboard first, outside the case: install the CPU, then the RAM, then the M.2 SSD, and finally the CPU cooler while the board is still on its box. Everything is more accessible before it goes in the case.
- Mount the power supply and route cables: a modular PSU lets you connect only the cables you need, which keeps airflow clean and the build tidy.
- Drop the motherboard into the case: line it up with the standoffs and the rear I/O shield, then secure it.
- Install the GPU last: it is the largest component and installing it early only blocks access to everything else.
Cable Management and Airflow
Good cable management is not just cosmetic; it directly affects temperatures and future serviceability. Route bulky cables behind the motherboard tray and use the case’s tie-down points to keep them clear of fan blades. Plan your airflow as intake at the front and bottom, exhaust at the rear and top, so cool air moves across the components in one direction. Even a modest set of case fans arranged correctly will keep a mid-range CPU and GPU comfortable under load, and a clean interior makes swapping parts a year from now far less painful.
First Boot and Testing
Before you screw the side panels on, do a test boot. Connect a monitor to the graphics card, plug in a keyboard, and power on. You are looking for the motherboard to POST and show the BIOS screen. In the BIOS, enable your memory’s XMP or EXPO profile so the RAM runs at its rated speed rather than a conservative default, confirm the CPU temperature looks sane at idle, and verify all your storage drives are detected. Only after the system boots cleanly, installs the operating system, and passes a short stress test should you tidy the final cables and close the case.
Tips
- Install the operating system on a fast NVMe SSD; it makes the entire system feel quicker and cuts game load times dramatically.
- Update the motherboard BIOS early if your CPU is newer than the board, as some boards need an update to recognise the latest chips.
- Do not overtighten screws, especially the four that hold the CPU cooler; snug is enough and over-torquing can flex the board.
- Keep the boxes and manuals for your major components in case you need to RMA a part or check a spec later.
Frequently Asked Questions
How long does it take to build a gaming PC for the first time?
Plan for two to four hours for your first build if you work carefully and read each manual step. Experienced builders finish in under an hour, but there is no prize for speed, and rushing is how components get damaged.
Is building a PC cheaper than buying a prebuilt?
Often, though the gap has narrowed. The real advantage of building is control and upgradeability rather than pure savings. When component prices spike, a well-configured prebuilt can occasionally match a self-build on cost, which is why the machines above are worth comparing against your parts list.
What is the most common first-time mistake?
Forgetting to enable the memory XMP or EXPO profile, which leaves fast RAM running slow, and failing to plug in the separate CPU power cable at the top of the board. Both are quick fixes once you know to check for them.
Do I need to apply thermal paste myself?
Most CPU coolers ship with a pre-applied thermal pad or paste, so you can mount them straight away. If you are reusing a cooler or it arrived bare, apply a small pea-sized dot to the centre of the CPU before seating it.
Conclusion
Building a gaming PC is a methodical process rather than a difficult one: plan compatible parts, work in a clean and grounded space, assemble in a sensible order, and test before you close the case. Take your time on the first build and you will end up with a machine you understand inside out and can upgrade for years. And if the assembly is not for you, a capable prebuilt like the options above gets you to the same finish line with none of the wiring.