Key takeaways
- Only “noise-free” claims: Look for actual information about balanced wiring and shielding type.
- No male-to-female description: Confirm the connector genders before ordering.
- Unusually stiff or thin jacket: This can make routing difficult or increase stress at the connectors.
- Loose connector fit: A cable that wiggles noticeably can produce intermittent audio.
- Suspiciously low price for a long cable: It may still work, but inspect reviews for reports of crackling, bent pins, or early failure.
- Unclear quantity: “Pack” listings sometimes include two short cables rather than one longer cable.
- Unrealistic technical promises: A cable cannot eliminate every ground-loop, computer, or power-supply problem.
What's inside
Choosing an XLR cable for streaming looks simple until a cheap cable introduces hum, crackle, or an awkward coil that pulls your microphone off position. The biggest mistake is treating shielding as a marketing phrase rather than one part of a balanced audio connection. “Low noise,” “premium,” and “oxygen-free copper” can all sound impressive, but they do not tell you everything about the cable’s construction or suitability for a desk, boom arm, interface, mixer, or stage.
For most streamers, the right cable is a durable male-to-female XLR cable with a properly balanced three-pin connection, effective shielding, flexible insulation, and enough length to route neatly without excess slack. The best choice depends on your room, equipment, cable path, and how often you move the microphone. This guide explains what to look for in XLR cable shielding streaming setups in 2026, including the specifications that actually affect daily use.
As an Amazon Associate we earn from qualifying purchases at no extra cost to you. Product prices and availability are accurate as of the date shown and are subject to change.


![Warrky XLR Cables 6.6ft 2 Pack [Oxygen-Free Copper (OFC), Gold-Plated Connector] Balanced Microphone Cable Male to Female Professional Hi-Fi XLR Cable](https://m.media-amazon.com/images/I/512MAkoedJL._SL160_.jpg)
Decide These 3 Things First
- How far is the microphone from the input? Measure the complete route, including the distance along a boom arm and the drop to your interface. Add 2 to 4 feet for repositioning and strain relief.
- Will the cable pass near interference? Cables running beside power strips, laptop chargers, LED lighting, monitor power bricks, and extension cords benefit most from robust shielding and careful routing.
- How much movement will it handle? A stationary desk microphone can use a lighter cable. A microphone on a swing arm, floor stand, or portable setup needs flexible insulation, molded strain relief, and connectors that tolerate repeated plugging and unplugging.
Once those answers are clear, compare the following factors in order. Shielding matters, but it works alongside balanced wiring, connector quality, and sensible cable placement.
1. Choose the Right Size and Length
Cable length affects both convenience and signal management. For a microphone sitting beside an audio interface, a 6-foot cable is often enough. A 10- to 15-foot cable suits most desktop boom arms and gives room to route behind a monitor. Choose 25 feet when the interface sits across a room or the microphone moves between positions. A 35- to 50-foot cable is more appropriate for a larger studio, live-streaming area, or stage-style setup.
Do not automatically buy the longest option. Extra cable creates loops that can catch on chair wheels and power cords. It also makes storage less tidy. As a general rule, buy the measured route plus 20 to 30 percent, not twice the required length.
Typical XLR microphone cables weigh approximately 0.15 to 0.3 pounds for 6 feet, 0.4 to 0.7 pounds for 25 feet, and 0.8 to 1.5 pounds for 50 feet, depending on jacket thickness and conductor size. A very heavy cable can pull on a small boom arm, while an extremely thin cable may feel less durable when frequently moved.
2. Understand Shielding and Conductor Material
Shielding helps reject electromagnetic and radio-frequency interference before it reaches the audio conductors. Common designs include braided shielding, spiral shielding, foil shielding, and combinations of these. Braided shields are generally favored for repeated handling because they can provide strong coverage while remaining flexible. Spiral shields can be flexible and economical, though their performance may vary when the cable is stretched or sharply bent. Foil shields can provide broad coverage, but the drain wire and overall construction matter just as much as the foil itself.
Look for a cable described as balanced, with two insulated signal conductors plus a shield. A standard microphone XLR cable normally uses three pins: positive, negative, and ground/shield. Balanced wiring is one of the main reasons XLR connections resist noise over longer runs.
Copper conductors are a sensible default. Oxygen-free copper, or OFC, is commonly promoted in premium listings, but the label alone does not guarantee lower noise. Shield design, connector fit, cable geometry, and the electrical equipment at each end are equally important. For home streaming, a well-made all-copper cable with dependable shielding is usually more valuable than paying extra for a material claim you cannot verify.
3. Inspect Construction and Connectors
Good construction shows up in the details. Look for a flexible PVC or similarly durable outer jacket, molded strain relief at both ends, and connectors that fit firmly without excessive play. The female end should have a reliable latch that locks onto the microphone or other male XLR connection. The male end should insert smoothly into the interface, mixer, or preamp without requiring unusual force.
Gold-plated contacts can resist surface corrosion, but they are not essential for every indoor setup. More important is a clean three-pin design, a secure shell, and consistent pin alignment. A cable listed as XLR-to-XLR should have male-to-female ends; an XLR-to-TRS cable is a different product and may be needed for certain mixers or patch bays.
Check the jacket diameter when the listing provides it. A 6-millimeter jacket is relatively manageable for desktop use. Cables around 6 to 7 millimeters offer a useful balance of flexibility and protection. Very thick jackets may survive harder handling but can be stiff around a compact boom arm.
4. Prioritize Handling and Real-World Performance
For streaming, “performance” means a stable, quiet connection during long sessions—not just a specification printed on the package. A cable should coil without fighting you, stay connected when the microphone moves, and avoid transmitting loud bumps when it brushes against the desk or arm.
Use hook-and-loop ties rather than tight zip ties, which can compress the jacket. Keep the XLR cable separated from AC power cables where practical, especially around chargers and power strips. If the cable must cross a power cable, crossing at approximately 90 degrees can reduce the length of parallel exposure.
Shielding cannot fix every noise problem. Hum may come from a ground loop, an ungrounded computer accessory, a faulty power supply, gain set too high, or a defective interface. Test a new cable with headphones and a known-good microphone. If the noise follows the cable when you swap it, the cable is a reasonable suspect. If the noise remains with multiple cables, look at the rest of the signal chain.
5. Compare Price Tiers Carefully
Budget XLR cables generally cost about $8 to $18 for 6 to 15 feet and $12 to $30 for 25 to 50 feet. They can work well for a fixed indoor streaming station when the connectors fit securely and the cable is not repeatedly bent.
Midrange cables usually cost about $20 to $45 for a single cable or a two-pack, depending on length. This tier often offers better strain relief, more consistent connector shells, thicker jackets, and more flexible handling. A 35-foot two-pack priced around $40 to $55 can be practical when you need a spare or run two microphones.
Premium options commonly run from $50 to $100 or more, especially for specialty lengths, braided jackets, touring construction, or established professional brands. For a home streamer, premium pricing is justified when the cable is moved often, installed in a difficult path, or covered by a stronger warranty—not simply because the listing uses words such as “studio grade.”
6. Check Warranty, Returns, and Delivery
A basic cable should have at least a 30-day return window, while better brands may offer a one-year warranty or longer. Read whether the warranty covers intermittent connections, broken connectors, or only manufacturing defects. Keep the packaging until the cable has passed a few sessions of movement and recording.
Delivery timing matters when replacing a failed cable before a broadcast. A cable listed as available for immediate shipment is useful, but confirm that the delivered item matches the listed length and quantity. Multi-packs can lower the per-cable price, yet they are poor value if you only need one and the unused cable sits coiled for years.
Spec Checklist
| Spec | Budget | Mid | Premium |
|---|---|---|---|
| Typical price | $8–$30 | $20–$55 | $50–$100+ |
| Useful lengths | 6–25 feet | 10–35 feet | 25–100 feet |
| Conductors | Copper, balanced, 3-pin | All-copper or OFC, balanced | Specified conductor gauge and professional balanced design |
| Shielding | Basic spiral or foil | Braided, foil, or combined shielding | Detailed coverage and construction information |
| Jacket | Approximately 5–6 mm PVC | Approximately 6–7 mm flexible PVC or rubber | Flexible, abrasion-resistant jacket |
| Best use | Fixed home desk | Boom arm, two-microphone setup, frequent adjustment | Mobile, stage-style, or demanding installations |
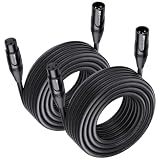
Examples illustrate the range: an inexpensive 25-foot all-copper cable can be suitable for a stationary setup, while a two-pack of 35-foot cables may make sense for dual microphones or a spare. A 50-foot OFC cable is useful when distance is the priority. Short 6.6-foot OFC cables with gold-plated connectors are convenient for compact desks, but they may be too short for a wide boom-arm route.
Red Flags
- Only “noise-free” claims: Look for actual information about balanced wiring and shielding type.
- No male-to-female description: Confirm the connector genders before ordering.
- Unusually stiff or thin jacket: This can make routing difficult or increase stress at the connectors.
- Loose connector fit: A cable that wiggles noticeably can produce intermittent audio.
- Suspiciously low price for a long cable: It may still work, but inspect reviews for reports of crackling, bent pins, or early failure.
- Unclear quantity: “Pack” listings sometimes include two short cables rather than one longer cable.
- Unrealistic technical promises: A cable cannot eliminate every ground-loop, computer, or power-supply problem.
FAQ
Is thicker XLR cable shielding always better for streaming?
No. Thicker shielding can offer durability and interference rejection, but excessive thickness can make a cable stiff and heavy. For most home streaming, a flexible cable around 6 to 7 millimeters in diameter with balanced wiring is a practical target.
How long should my streaming XLR cable be?
Use 6 feet for a compact setup, 10 to 15 feet for most desk-mounted boom arms, and 25 feet when the interface is several feet away. Add roughly 20 to 30 percent beyond the measured route so the cable does not pull tight during microphone adjustment.
Does OFC make a microphone cable sound better?
OFC can be a legitimate conductor specification, but it does not guarantee an audible improvement by itself. Shielding, balanced construction, connector quality, cable placement, and the microphone and interface have a larger practical effect on noise and reliability.
Can an XLR cable remove hum from my stream?
It may reduce interference if the original cable was poorly shielded or defective, but it cannot solve every hum source. Test the cable with other equipment, separate it from power wiring, and investigate ground loops, chargers, gain settings, and the interface if the problem continues.