Key takeaways
- To check RAM compatibility with your motherboard, match three things: the memory generation (DDR4 or DDR5).
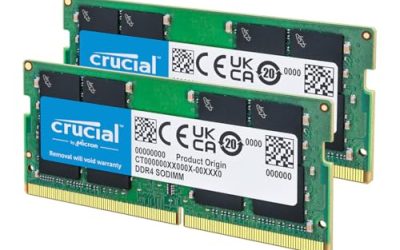
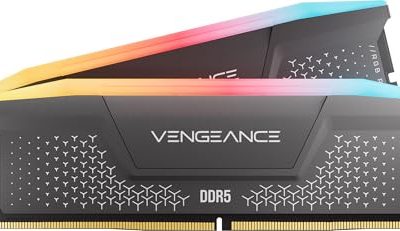
To check RAM compatibility with your motherboard, match three things: the memory generation (DDR4 or DDR5), the form factor (full-size DIMM for desktops, SO-DIMM for laptops and mini PCs), and the speed and capacity limits listed in the board’s memory support documentation. If those three line up, the kit will physically fit and will boot. Everything else is fine-tuning.
This guide is for anyone building a gaming PC, upgrading an older one, or replacing a failed stick, and who wants to avoid the classic mistake of buying a kit that will not seat in the slot or that runs far slower than advertised. The steps below work in 2026 whether you own a recent board or one that is several years old.
Start With the Memory Generation
The generation is the one non-negotiable check. DDR4 and DDR5 modules use different notch positions on the connector, so a DDR5 stick cannot be pushed into a DDR4 slot, and forcing it can crack the slot or the module. Older DDR3 boards are a separate story again and are rarely worth upgrading today.
Find the generation in the motherboard manual, on the product page, or printed beside the DIMM slots. Many boards also show it in the model name or chipset family, but do not rely on that alone, because some chipsets had variants for both generations. When in doubt, read the spec sheet line that says “Memory Type.”
Read the Motherboard Memory Specifications
Every board maker publishes a memory section in its specifications. It lists the generation, the number of slots, the maximum total capacity, the maximum capacity per slot, and a table of supported speeds. Pull this up before you shop, and keep it open as you compare kits.
Slots and total capacity
Count the DIMM slots. Most full-size boards have two or four. Divide the maximum supported capacity by the slot count to find the largest single stick the board accepts. A board with four slots and a stated maximum of 128 GB takes 32 GB sticks; a two-slot board with the same maximum can take 64 GB sticks only if the manual says so.
Rated speed versus supported speed
Memory kits are labeled with an advertised speed, such as a DDR4 or DDR5 transfer rate. The board lists a native speed plus a range it can reach through an overclocking profile. If the kit is faster than the board’s listed ceiling, it will still usually work, but it may fall back to a lower speed. That is not a defect; it is the board and processor protecting stability.
The processor matters too
The memory controller sits inside the processor, not the board. A processor has its own official memory speed and sometimes its own capacity limit. If the board and processor disagree, the lower number wins. Check the processor maker’s specification page alongside the board manual.
Use the Qualified Vendor List
Most board makers publish a Qualified Vendor List, often shortened to QVL. It is a spreadsheet of specific memory kits the manufacturer has validated on that board, listing the kit model, capacity, speed, and sometimes the number of modules. Finding your exact kit on the list is the strongest compatibility signal you can get before purchase.
A kit that is not on the list is not automatically a problem. QVLs are limited by what the vendor had time to validate, and they tend to lag behind new releases. Treat the list as a green light when you find a match, and as a tiebreaker between two similar kits when you do not.
Match Modules in a Kit
Memory is sold in kits of two or four sticks that were binned and verified together. Buying a single kit that matches your target capacity is safer than mixing separate kits, even if they share the same label. Differences in chip makers or timings between batches can cause instability or force the whole set down to the slowest module’s speed.
- Use two sticks in dual-channel on a four-slot board unless you truly need four sticks for capacity.
- Populate the slots the manual names for two-stick setups, which are commonly the second and fourth slot counting from the processor.
- Avoid mixing different capacities in the same channel when stability matters more than a few extra gigabytes.
Compatibility Checklist Table
| Check | Where to find it | What a pass looks like |
|---|---|---|
| Generation | Board spec sheet, notch beside the slots | Kit and board both list the same DDR generation |
| Form factor | Kit description, board manual | Desktop DIMM for a desktop board; SO-DIMM for compact systems |
| Capacity per slot | Memory section of the manual | Stick size is at or below the per-slot limit |
| Total capacity | Memory section of the manual | Kit total is at or below the board maximum |
| Speed | Supported speeds table, processor page | Kit speed sits inside both the board and processor ranges |
| Validation | Qualified Vendor List | Exact kit model appears on the list |
| Clearance | Kit height versus cooler layout | Tall heat spreaders clear the cooler fins |
Before You Buy Checklist
- Write down your exact motherboard model, not just the chipset name. The model is printed on the board and shown in system information.
- Open the board’s memory specification page and note generation, slot count, per-slot limit, and speed range.
- Look up your processor’s official memory support so you know which ceiling applies.
- Search the Qualified Vendor List for the kit you are considering.
- Check kit height if you use a large air cooler that overhangs the first slots.
- Confirm the return policy in case the kit refuses to boot.
How to Check on an Existing Build
If you already own the PC and are not sure what board it uses, you can find out without opening the case. In Windows, the System Information tool lists the board manufacturer and model. The Task Manager performance tab for memory shows the current speed, the number of slots used, and the form factor. Free system utilities will also read the part number printed on each existing stick, which helps when you want to add a matching module.
Adding to an existing pair is the trickiest case. If the new stick differs in speed, the system will run everything at the slower setting. If it differs in timings or chip maker, instability can show up as random crashes or boot loops. When the budget allows, replacing the whole set with one new kit is the more predictable path.
Turning on the Rated Speed
New kits usually ship running at a conservative default, not at the speed printed on the label. To get the advertised performance you enable an overclocking profile in the firmware. Depending on the maker, it may be called XMP, EXPO, or a similar name. Enter the firmware setup at boot, find the memory profile option, and pick the first profile.
If the system fails to boot after you enable it, clear the firmware settings with the jumper or the reset button on the board, and then try again at a lower speed. Updating the firmware to the latest stable version often improves memory support, especially for newer kits on older boards.
Common Mistakes to Avoid
Most failed memory upgrades come from a short list of avoidable errors. The first is buying by capacity alone. Sixty-four gigabytes of the wrong generation is useless, so confirm the generation before anything else. The second is assuming that a four-stick kit is better than a two-stick kit. On many recent platforms, four sticks put more load on the memory controller and force a lower speed, so two larger sticks are often the steadier choice.
A third mistake is ignoring the firmware version. Some boards need an update before they recognize newer, denser modules, and an out-of-date board may refuse to start with a kit that the manual lists as supported. If a new kit fails to boot, try one stick in the first recommended slot, update the firmware, and then add the second stick.
Finally, do not skip the physical check. Heat spreaders on tall kits can collide with a large cooler, and a stick that is not pushed in until both clips click will cause a no-boot or a missing-memory warning. Press firmly and evenly on both ends and listen for the clips.
Related guides
- Hall Effect Vs Potentiometer Controller Sticks Explained
- Low Profile Cpu Coolers For Small Form Factor Pcs
- How To Transfer Nintendo Switch Data To A New Console
Frequently Asked Questions
Can I use DDR5 memory in a DDR4 motherboard?
No. The two generations use different slot notches and electrical standards. A board only accepts the generation it was designed for, so you must replace both the board and the memory together if you want to move up.
Will faster RAM than my board lists work?
Usually yes, but it will typically run at the highest speed the board and processor support. You will not damage anything, though you pay for performance you cannot use. Match the kit to the supported range to avoid waste.
Is it safe to mix two different RAM kits?
It can work, but it is the least predictable option. The system may run at the slowest module’s settings or may fail to boot at all. A single matched kit is the safer choice for gaming builds.
How much RAM do I need for gaming?
Many current games run comfortably on 16 GB, while 32 GB gives breathing room for streaming, multitasking, and large open-world titles. Check the recommended specs of the games you play most and the capacity limit of your board before deciding.
FAQ
Can I use DDR5 memory in a DDR4 motherboard?
Will faster RAM than my board lists work?
Is it safe to mix two different RAM kits?
How much RAM do I need for gaming?
More from Amazon
Programs that pair well with the guide above. Offers and eligibility are set by Amazon and may change.
Free shipping on eligible items, Prime Video and more. Eligible new members can start with a free trial.
Start a Prime free trialAd-free music streaming. Eligible new subscribers can start with a free trial.
Try Music Unlimited freeA Prime membership for ages 18-24 with a trial period. Eligibility is set by Amazon.
See Prime for Young AdultsAudiobooks and podcasts to listen to on the go. Eligible new members can start with a free trial.
Try Audible freeAs an Amazon Associate we earn from qualifying purchases.