
Key takeaways
- Clamping onto a fragile surface: Do not attach a boom arm directly to unsupported glass, a thin shelf, or a weak particleboard overhang unless the furniture maker says it can handle a clamp load.
- Ignoring the desk thickness: Forcing a clamp onto a desk thicker than its opening can bend the frame or strip the screw.
- Using thick foam as a pad: Soft foam compresses and shifts. Choose firm rubber, cork, or dense neoprene instead.
- Blaming the clamp for a loose pivot: A secure clamp cannot compensate for a sagging elbow joint, weak spring, or loose microphone-thread adapter.
- Exceeding the arm’s capacity: A heavier broadcast microphone, large shock mount, and metal pop filter can overload an inexpensive scissor arm.
- Using permanent threadlocker: Permanent formulas can make future adjustments or replacement difficult. Use removable or medium-strength threadlocker only on compatible metal screws.
A loose desktop clamp can turn a microphone boom arm from a useful recording tool into a frustrating—and sometimes risky—piece of desk hardware. The arm may sag, swivel when you touch the microphone, scrape the desktop, or suddenly slip free under the microphone’s weight. Tightening it too aggressively can be just as troublesome: overtightening may crush particleboard, dent a thin desktop, strip the clamp screw threads, or crack a glass surface.
This guide explains how to tighten a loose desktop clamp on a mic boom arm without damaging your desk or the stand. The process works for most spring-loaded scissor arms and tube-style boom arms, including budget models designed for microphones such as Blue Yeti, Fifine, HyperX, and similar USB or XLR mics. In 2026, many desktop boom arms still use the same basic clamp-and-screw design, so the repair is usually quick and inexpensive.
As an Amazon Associate we earn from qualifying purchases at no extra cost to you. Product prices and availability are accurate as of the date shown and are subject to change.
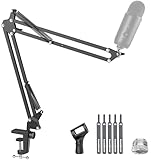

What You Need
| Item | Why | Optional? |
|---|---|---|
| Clean cloth or paper towel | Removes dust, oil, and grit from the clamp pads and desk edge. | No |
| Small flashlight | Helps inspect the clamp screw, threads, and underside of the desktop. | Yes |
| Rubber or cork pad, 1/16- to 1/8-inch thick | Improves grip and protects wood veneer, laminate, and painted surfaces. | Recommended |
| Phillips screwdriver or hex key set | Tightens pivot screws or set screws on arms with adjustable hardware. | Depends on arm |
| Threadlocker, removable/medium strength | Helps a repeatedly loosening pivot screw stay in place. | Yes |
| Replacement desk clamp | Needed if the screw threads, clamp frame, or pressure pad are damaged. | Only if damaged |
Step-by-Step
-
Remove the microphone and reduce the load (2–4 minutes)
Take the microphone off the boom arm before adjusting the clamp. Remove the shock mount, pop filter, cable clips, and any accessories that add weight or pull the arm sideways. A typical USB microphone can weigh 1 to 3 pounds, while a microphone, shock mount, and pop filter together may exceed the safe load of a light-duty arm.
Set the arm in its lowest, most folded position. This reduces spring tension and keeps the arm from swinging while you work. If the microphone cable is routed through the arm, unplug it from the computer or interface first so it cannot snag.
-
Inspect the desktop edge and clamp contact points (3–5 minutes)
Look at the top and bottom surfaces where the clamp touches the desk. Remove dust, crumbs, felt fibers, and oily residue with a dry cloth. Even a small piece of debris can prevent the clamp pad from sitting flat, creating a wobble that feels like a loose screw.
Check that the clamp is installed on a solid section of desktop. Avoid cable-management cutouts, damaged veneer, rounded edges, desk lips, and thin overhangs. Most standard desk clamps fit desktops roughly 0.4 to 2.4 inches thick, but check your arm’s instructions if available. A clamp positioned over a hollow or weak desk edge can loosen no matter how firmly it is tightened.
-
Reposition the clamp so it sits squarely (2–3 minutes)
Loosen the clamp screw enough to lift the clamp off the desk, then reposition it. The upper clamp plate should lie flat on the desktop, while the lower pressure pad should contact the underside directly below it. The vertical clamp post should be perpendicular to the desktop—not tilted toward or away from the edge.
Leave at least 1 inch of solid desktop material between the clamp and a corner, grommet hole, or cable cutout. On a desk with a beveled front edge, move the clamp farther back until both pads contact flat material. A square installation prevents the arm’s sideways force from gradually walking the clamp loose.
-
Add a protective non-slip pad if needed (2 minutes)
If your desktop is smooth laminate, glossy painted wood, metal, or glass rated for clamping, place a thin rubber or cork pad between the clamp and desk. Use a pad no thicker than 1/8 inch; a very thick or soft pad can compress unevenly and make the arm less stable.
Cut the pad slightly larger than the clamp’s top plate if possible. If the lower clamp pad is bare metal or hardened plastic, add a second small pad beneath the desktop as well. This protects the finish while increasing friction, so you do not need to overtighten the screw.
-
Tighten the main clamp screw gradually (2–4 minutes)
Turn the clamp handle clockwise until the lower pad meets the underside of the desk. Continue in small increments—about one-quarter turn at a time—while holding the clamp body steady with your other hand. Stop when the clamp cannot be shifted by hand with moderate force.
Do not use pliers, a wrench, or a screwdriver for extra leverage unless the clamp manufacturer specifically provides a tool-driven fitting. Hand tightening is normally enough. On particleboard, MDF, or hollow-core furniture, excessive force can permanently compress the material and actually cause the clamp to loosen later.
-
Check the arm’s mounting socket and pivot hardware (4–6 minutes)
If the desktop clamp is secure but the arm still feels loose, inspect the connection between the boom arm and the clamp’s vertical socket. Some arms simply drop into a round receiver; others have a side set screw, retaining collar, or plastic tension ring. Seat the arm fully in the socket, then tighten any set screw only until it removes wobble.
Next, inspect the arm’s elbow joints and microphone-end pivot. Tighten visible Phillips or hex-head screws in small increments. The arm should hold its position without requiring force to move. If a pivot loosens repeatedly, remove the screw, apply a small drop of removable or medium-strength threadlocker to the threads, and reinstall it. Keep threadlocker away from plastic joints and painted surfaces.
-
Reinstall the microphone and balance the arm (4–5 minutes)
Reattach the microphone and accessories, keeping within the boom arm’s stated weight limit. Route the cable with enough slack at each joint so it does not pull the microphone down or twist the clamp. A tightly stretched XLR or USB cable can make a properly tightened clamp appear unstable.
Move the microphone to your normal speaking position, usually 4 to 8 inches from your mouth. Let go slowly and watch for movement at the clamp. If the arm rotates or the clamp shifts, lower the arm, tighten the main screw another quarter turn, and test again.
-
Perform a final stability check (2 minutes)
Gently push the boom arm side to side, then lightly pull upward near the microphone mount. The desk clamp should not slide, rock, or lift at one edge. Check the underside of the desktop for indentation, cracking, or crushed laminate. If you see damage beginning, loosen the clamp immediately and add wider protective pads or move to a stronger section of desk.
Mistakes to Avoid
- Clamping onto a fragile surface: Do not attach a boom arm directly to unsupported glass, a thin shelf, or a weak particleboard overhang unless the furniture maker says it can handle a clamp load.
- Ignoring the desk thickness: Forcing a clamp onto a desk thicker than its opening can bend the frame or strip the screw.
- Using thick foam as a pad: Soft foam compresses and shifts. Choose firm rubber, cork, or dense neoprene instead.
- Blaming the clamp for a loose pivot: A secure clamp cannot compensate for a sagging elbow joint, weak spring, or loose microphone-thread adapter.
- Exceeding the arm’s capacity: A heavier broadcast microphone, large shock mount, and metal pop filter can overload an inexpensive scissor arm.
- Using permanent threadlocker: Permanent formulas can make future adjustments or replacement difficult. Use removable or medium-strength threadlocker only on compatible metal screws.
How Often
Check the clamp once a month if you move the microphone frequently, share the desk, or adjust the arm for streaming, gaming, and video calls. For a mostly stationary setup, inspect it every three to six months. Tighten the clamp whenever you change microphones, add a heavier shock mount, relocate the arm, or notice rotation at the desk edge.
Do not tighten it automatically at every check. First test for movement. Repeated unnecessary tightening can compress soft desktop materials and shorten the life of the clamp pad.
When to Call a Pro or Replace
Replace the clamp or boom arm if the screw spins without tightening, the threads are visibly flattened, the clamp frame is bent, or the pressure pad has cracked or fallen off. A standalone replacement can be economical: basic metal desk clamps are often around $9 to $20, while an entry-level complete boom arm commonly costs about $20 to $40. For example, a SUNMON adjustable metal replacement clamp may be priced near $8.99, while a basic InnoGear boom arm may be around $24.99.
Ask a furniture repair professional for help if the desktop is splitting, the underside is crumbling, or the desk is a valuable solid-wood, veneer, stone, or specialty glass piece. If your microphone setup is heavy or used in a commercial studio, consider a desk-mounted grommet base or a freestanding weighted stand rather than continuing to stress a marginal clamp location.
FAQ
Why does my mic boom arm clamp keep loosening?
The usual causes are dust on the contact surfaces, a clamp positioned on a beveled or weak desk edge, a cable pulling sideways, or a microphone setup that exceeds the arm’s capacity. A worn screw thread or compressed particleboard can also prevent the clamp from holding tension.
How tight should a desktop mic arm clamp be?
It should be tight enough that you cannot rotate or slide the clamp by hand using moderate force. Stop before the desktop dents, creaks, or visibly compresses. Hand pressure on the clamp handle is generally sufficient; do not add leverage with tools.
Can I use a boom arm clamp on a glass desk?
Only if the desk manufacturer specifically permits clamping and the glass is properly supported. Use wide protective pads on both sides, avoid edges and corners, and do not overtighten. When in doubt, use a freestanding microphone stand instead.
Should I replace the whole boom arm if only the clamp is loose?
Not necessarily. If the arm’s springs, joints, and microphone threads work properly, replacing only the clamp is often the more affordable fix. Replace the complete arm when multiple pivots sag, the frame is bent, or the arm cannot safely support your microphone after adjustment.


