Key takeaways
- Clamping to the microphone body: This can transmit vibration, scratch the finish, obstruct controls, and place unwanted weight on a shock mount.
- Mounting at the very end of the boom arm: The extra leverage encourages clamp rotation and can make the entire arm dip.
- Extending the gooseneck straight out: A long, straight extension is the most likely shape to sag. Use compact, gradual curves instead.
- Using pliers to tighten a clamp: Excess force can strip threads or crack plastic parts. Improve grip with rubber rather than brute force.
- Using thick padding: Thick foam, towels, and folded cloth create a soft mounting surface that shifts under load.
- Bending one spot repeatedly: Reworking the same section of gooseneck can permanently weaken it.
- Ignoring boom arm tension: If the arm itself sinks, correct its spring or joint tension before blaming the pop filter.
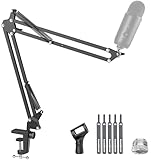
A pop filter that slowly droops into the microphone path is more than an annoyance. It can block your view of notes or a screen, bump the mic during a take, transmit handling noise through the boom arm, and make it harder to maintain a consistent 2- to 4-inch speaking distance. In the worst cases, a sagging gooseneck can swing into the capsule or grille, risking scratches and ruining a recording session.
The usual cause is simple: the filter’s flexible arm, clamp, or mounting surface is carrying more leverage than it was designed to hold. A quick reset, better clamp placement, and proper support can usually solve the issue without replacing the entire setup. Here is how to keep a pop filter stable on a boom arm in 2026.
As an Amazon Associate we earn from qualifying purchases at no extra cost to you. Product prices and availability are accurate as of the date shown and are subject to change.


What You Need
| Item | Why | Optional? |
|---|---|---|
| Pop filter with clamp and flexible arm | The filter and gooseneck assembly you are adjusting. | No |
| Boom arm and microphone setup | Lets you position the filter relative to the microphone as it will be used. | No |
| Clean microfiber cloth | Removes dust, skin oil, and residue from clamp pads and mounting surfaces. | Recommended |
| Isopropyl alcohol, 70% or higher | Useful for cleaning greasy clamp contact points before tightening. | Optional |
| Thin rubber sheet, shelf liner, or rubber pad | Adds grip and protects painted or polished boom arms from clamp marks. | Recommended |
| Reusable hook-and-loop strap or cable tie | Creates a secondary support point for a long, heavy, or tired gooseneck. | Optional |
| Small screwdriver or hex key | Needed only if your clamp, arm mount, or microphone shock mount uses a set screw. | Optional |
Step-by-Step
1. Identify where the sag starts (2 minutes)
Before tightening anything, determine whether the problem is the clamp, the flexible gooseneck, the boom arm, or the microphone mount. Place the pop filter in its normal recording position, then let go carefully. Watch for the first point that moves.
If the entire filter assembly rotates around the boom arm, the clamp is slipping. If the clamp stays still but the filter head drops, the gooseneck has lost stiffness or is extended too far. If both the microphone and filter drift downward, adjust the boom arm tension first. A loose boom arm cannot provide a stable platform for a pop filter.
2. Remove the filter and clean the contact surfaces (3 minutes)
Open the clamp and remove the pop filter from the boom arm. Wipe the inside of the clamp pads and the section of boom arm where it was mounted with a dry microfiber cloth. If either surface feels oily or slick, lightly dampen the cloth with isopropyl alcohol and wipe again. Let it dry fully before reattaching.
Dust and skin oil can make even a firmly tightened clamp rotate. Avoid spraying cleaner directly on the boom arm, especially around springs, joints, cables, or painted finishes.
3. Choose the strongest mounting location (3 minutes)
Mount the pop filter near a rigid part of the boom arm rather than at the outermost end. The farther the clamp sits from a supported joint, the more leverage the filter creates. A clamp placed 4 to 8 inches back from the microphone end is usually more stable than one attached right beside the microphone.
Choose a straight, round section of tubing whenever possible. Avoid clamping onto a moving hinge, an arm joint, a cable channel cover, or a tapered section of metal. If your boom arm has a rectangular profile, position the clamp so both pads make broad, even contact instead of gripping only an edge.
4. Add a thin non-slip layer if needed (2 minutes)
If the clamp keeps rotating on a smooth painted, chrome, or powder-coated arm, cut a small piece of thin rubber shelf liner or rubber sheeting. A piece about 1 by 2 inches is usually enough. Place it between the clamp and the boom arm, keeping it flat and centered.
The goal is grip, not bulk. Avoid thick foam, folded fabric, or several layers of tape. Those materials compress over time and can actually make the clamp less secure. A thin rubber layer also helps prevent dents and scratches from a metal clamp.
5. Tighten the clamp evenly without overtightening (2 minutes)
Reattach the pop filter and tighten the clamp until it cannot be rotated by a moderate hand twist. For most desk-style clamps, that means firm hand pressure on the adjustment knob rather than using pliers or forcing the screw. Overtightening can crack plastic clamp bodies, strip threads, deform lightweight boom arms, or damage the protective finish.
Once tightened, gently push the filter ring downward and sideways. The clamp should remain fixed. If it slips, move it to a straighter section of arm, clean the surfaces again, or use the thin rubber pad described above.
6. Shorten and reshape the gooseneck (4 minutes)
A flexible arm becomes less stable as it extends farther from its clamp. Keep the gooseneck as short as practical. Rather than stretching it straight toward the microphone, form it into a shallow S curve or a compact curve with two gradual bends. This reduces the unsupported reach and helps distribute the filter’s weight.
Do not make sharp kinks. Bend the gooseneck using both hands, moving it a little at a time along its length. Repeatedly bending the same 1-inch section can fatigue the internal metal and make sagging worse. For a typical 5.91-inch filter screen, aim to keep the center of the screen roughly 2 to 4 inches from the microphone grille.
7. Position the filter in front of the mic, not on top of it (2 minutes)
Set the filter so it sits vertically between your mouth and the microphone. The screen should cover the speaking side of the capsule, but it should not rest on the mic or press against a shock mount. Leave at least 1 inch of clearance between the filter frame and the microphone grille.
If you record into the top of a microphone, such as many USB desktop models, mount the filter so its arm approaches from the side. A side approach creates less downward pull than draping the filter directly above the microphone.
8. Add secondary support for persistent sagging (5 minutes)
If the gooseneck still droops after repositioning, use a reusable hook-and-loop strap to secure part of the flexible arm to the boom arm. Leave enough slack near the filter head for final positioning, but support the heaviest middle section of the gooseneck. Do not cinch the strap so tightly that it crushes a cable or prevents the boom arm from moving normally.
This method works especially well for budget filters with long flexible arms. Basic double-layer pop filters commonly cost about $5 to $9, while purpose-shaped shield designs and model-specific clamps may cost more. A low-cost filter can work well, but its gooseneck may not stay rigid indefinitely under constant tension.
9. Test the setup before recording (2 minutes)
Move the boom arm through the positions you normally use: seated, standing, close-mic narration, or singing. Then speak a few plosive-heavy phrases, such as “Peter picked a purple pepper” and “big bright balloon.” Check that the filter does not drift, touch the microphone, obscure controls, or pull the boom arm down.
Make a final adjustment with the microphone and pop filter in their actual working positions. A setup that looks stable while the arm is folded may shift once the arm is extended.
Mistakes to Avoid
- Clamping to the microphone body: This can transmit vibration, scratch the finish, obstruct controls, and place unwanted weight on a shock mount.
- Mounting at the very end of the boom arm: The extra leverage encourages clamp rotation and can make the entire arm dip.
- Extending the gooseneck straight out: A long, straight extension is the most likely shape to sag. Use compact, gradual curves instead.
- Using pliers to tighten a clamp: Excess force can strip threads or crack plastic parts. Improve grip with rubber rather than brute force.
- Using thick padding: Thick foam, towels, and folded cloth create a soft mounting surface that shifts under load.
- Bending one spot repeatedly: Reworking the same section of gooseneck can permanently weaken it.
- Ignoring boom arm tension: If the arm itself sinks, correct its spring or joint tension before blaming the pop filter.
How Often
Check the clamp and filter position every time you reposition the boom arm significantly, travel with the setup, or switch between users. For a stationary home studio, do a quick stability test once a month: lightly press the filter in several directions and confirm that the clamp does not rotate.
Clean clamp pads and the mounting surface every 3 to 6 months, or sooner if the equipment is in a humid room, near a kitchen, or handled frequently. If you use the microphone daily, inspect the gooseneck monthly for soft spots, bent coils, loose joints, or a screen that no longer stays at the chosen angle.
When to Call a Pro or Replace
You usually do not need a professional for a sagging pop filter. Replacement is the better option when the gooseneck remains floppy even when shortened, the clamp threads are stripped, the clamp body is cracked, or the filter frame is bent enough to contact the microphone.
Consider a new filter if your current model cannot hold a 5- to 6-inch screen 2 to 4 inches from the mic without secondary straps. A replacement with a shorter, stiffer gooseneck or a dedicated crab-style clamp can be a worthwhile upgrade for heavy use. Call a studio technician or audio equipment repair shop if the issue involves a damaged boom arm hinge, broken internal spring, unstable desk mount, or a valuable microphone that may have been knocked or stressed.
FAQ
Why does my pop filter sag even when the clamp is tight?
If the clamp stays in place but the filter head falls, the problem is usually the gooseneck, not the clamp. Shorten the reach, reshape it into gradual curves, and add a hook-and-loop support strap if necessary. If it still will not hold position, the flexible arm has likely worn out.
How far should a pop filter be from a microphone?
For most speaking and vocal setups, place the pop filter about 2 to 4 inches from the microphone grille. Position your mouth another 2 to 6 inches from the filter based on the microphone type, your voice level, and the sound you want. Keep at least 1 inch between the filter frame and the mic.
Can I attach a pop filter to a microphone boom arm?
Yes. Attach it to a straight, rigid portion of the boom arm, preferably 4 to 8 inches behind the microphone end rather than on a joint or at the farthest tip. Use a thin rubber pad if the clamp slides on the arm’s finish.
Will a heavier metal pop filter stop sagging?
Not necessarily. A heavier filter may have a stronger frame, but it also adds more weight and leverage to the gooseneck and clamp. Stability depends more on clamp grip, mounting location, gooseneck length, and arm stiffness than on weight alone.