
Key takeaways
- Using the microphone weight alone: The shock mount, pop filter, cable, and adapters all add load.
- Ignoring extension: A capacity rating may apply near the clamp, while a fully extended arm has more leverage and may sag.
- Buying the longest arm available: Extra reach can reduce stability and make the microphone harder to position.
- Forgetting desk thickness: A clamp that is too small or too large cannot distribute pressure correctly.
- Mounting on a weak surface: Hollow desks, glass, thin shelves, and damaged particleboard may flex even when the arm itself is strong.
- Failing to check thread compatibility: Microphone mounts may use different thread sizes, so an adapter can be required.
- Leaving no movement clearance: An arm that fits at one angle may strike your monitor when folded or repositioned.
What's inside
A boom arm’s weight rating should exceed the combined weight of your microphone, shock mount, pop filter, cable, and any adapter. For most desktop microphones, a safe target is a boom arm rated for at least 2 pounds (0.9 kg). Choose 3 to 5 pounds (1.4 to 2.3 kg) if you use a heavy broadcast microphone, a large shock mount, or a long arm that extends far over the desk.
Capacity is only one part of the fit. The arm must also reach your recording position, clamp securely to the desk, clear shelves and monitors, and fold or swing out of the way. This guide explains the practical measurements to check before buying a mic arm in 2026.
As an Amazon Associate we earn from qualifying purchases at no extra cost to you. Product prices and availability are accurate as of the date shown and are subject to change.


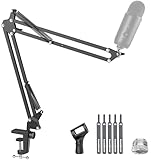
The Short Answer
Most home users should buy a boom arm with a stated capacity of 2 to 3 pounds (0.9 to 1.4 kg). That range handles common USB microphones such as the Blue Yeti, Fifine models, and many compact dynamic microphones, provided the arm includes a suitable mount or adapter.
For a heavy broadcast microphone, select a rating of 3 to 5 pounds (1.4 to 2.3 kg). Add the microphone’s weight, shock mount, pop filter, cable, and any accessories before comparing the total with the arm’s capacity. A practical safety margin is 25% to 50%. For example, a 2-pound setup should use an arm rated for at least 2.5 to 3 pounds.
Capacity can drop when the arm is fully extended. A microphone may stay balanced close to the clamp but slowly sink when positioned 25 to 30 inches away. Look for an arm with tension adjustment, strong springs, friction joints, or a gas-spring mechanism. Also confirm the desk clamp’s thickness range and whether the manufacturer specifies a maximum extension for the advertised capacity.
Standard Sizes
Boom arms are commonly sold in compact, standard, and extended sizes. The dimensions below describe useful buying categories rather than one universal industry standard. Manufacturers measure length differently, so compare the listed arm reach with your own desk layout.
| Arm type | Typical reach | Typical folded length | Common capacity | Best for |
|---|---|---|---|---|
| Compact | 12–18 in (30.5–45.7 cm) | 10–14 in (25.4–35.6 cm) | 1–2.5 lb (0.45–1.13 kg) | Small desks, laptops, close speech |
| Standard | 18–28 in (45.7–71.1 cm) | 14–20 in (35.6–50.8 cm) | 2–4 lb (0.9–1.8 kg) | Most home studios and gaming desks |
| Extended | 28–36 in (71.1–91.4 cm) | 18–26 in (45.7–66 cm) | 3–5 lb (1.4–2.3 kg) | Wide desks, shared cameras, side mounting |
| Low-profile | 16–24 in (40.6–61 cm) | 12–18 in (30.5–45.7 cm) | 2–4 lb (0.9–1.8 kg) | Clear sightlines below a monitor |
A standard 18- to 28-inch (45.7- to 71.1-centimeter) arm is the safest starting point for most buyers. A 12-inch arm can be excellent for a compact setup, but it may not reach around a monitor. An arm longer than 28 inches gives you more placement freedom but creates more leverage on the clamp and joints. If your microphone sits far from the desk edge, do not choose a long arm solely because its maximum weight rating looks higher.
Common budget arms, including models sold for roughly $20 to $35, are usually aimed at lighter microphones and basic desk setups. Heavier or more adjustable arms commonly fall in the $40 to $80 range. For reference, InnoGear examples in this category are often priced around $23 to $50, depending on the low-profile design, cable-management features, and included hardware. Price does not guarantee capacity, so verify the manufacturer’s weight rating rather than judging by the arm’s appearance.
How to Measure Your Space
- Weigh the complete microphone package. Weigh the microphone, shock mount, pop filter, cable, and any adapter together. If you cannot weigh the parts, add their published weights. A 1.5-pound microphone can become a 2-pound load after accessories.
- Measure the desktop thickness. Use a ruler or caliper at the intended clamp location. Many clamps fit desks approximately 0.8 to 2.4 inches (2 to 6.1 cm) thick, but ranges vary. A thick beveled edge, cable tray, or rear lip can prevent a full clamp connection.
- Find the mounting point. Measure from the clamp location to where you want the microphone capsule. This is the minimum horizontal reach. Add 2 to 4 inches (5.1 to 10.2 cm) if you want room to swing the microphone beside a monitor or keyboard.
- Check vertical clearance. Measure from the desktop to the bottom of shelves, cabinets, monitor stands, or wall-mounted equipment. Allow space for the arm’s joints to rise above the desk. A low-profile arm can work well under a monitor, while a traditional scissor arm may need 20 to 28 inches (50.8 to 71.1 cm) of open height.
- Measure the microphone position. Most speech microphones work best with the capsule about 4 to 8 inches (10.2 to 20.3 cm) from your mouth, depending on the microphone design. Mark that position on the desk and confirm the arm can reach it without crossing your screen.
- Test the swing path. Use painter’s tape to outline the arm’s approximate path. Check whether it hits a monitor, lamp, camera, or wall. Leave at least 1 to 2 inches (2.5 to 5.1 cm) of clearance around moving joints.
- Inspect the underside. Look for drawers, metal frames, reinforcing bars, and cable trays. A clamp may fit the top surface but lack enough room underneath to tighten safely.
By Room or Use Case
Bedroom or Small Home Office
Choose a compact or low-profile arm with a 12- to 20-inch (30.5- to 50.8-centimeter) reach. A capacity of 2 pounds (0.9 kg) is usually enough for a USB microphone and modest accessories. Low-profile designs keep the arm below or beside a monitor and are less visually intrusive in a multipurpose room. Confirm that the clamp does not press against a thin folding or particleboard desk edge.
Gaming Desk
A standard 18- to 28-inch (45.7- to 71.1-centimeter) arm offers enough reach to move the microphone between gaming, streaming, and keyboard positions. Select at least 2 to 3 pounds (0.9 to 1.4 kg) of capacity if you use a USB microphone, pop filter, and shock mount. Cable channels or clips are particularly useful because they prevent the cable from pulling on the joints while you move the arm.
Podcast or Voice-Over Setup
Use a sturdier arm rated for 3 to 5 pounds (1.4 to 2.3 kg), especially with a broadcast-style dynamic microphone and metal shock mount. A 20- to 30-inch (50.8- to 76.2-centimeter) reach usually provides comfortable positioning for a seated speaker. A smooth tension system matters more than extreme length: the microphone should remain at mouth level when you release it.
Shared Desk or Two-Person Workspace
An extended arm or a rear-mounted clamp may be necessary when the microphone must swing across a wide desk. Measure the full diagonal path, not just the straight distance to your chair. Choose a capacity at least 50% higher than the measured load because extended reach increases leverage. A 4-pound-rated arm carrying a 2.5-pound setup gives more useful stability than a 3-pound arm at its limit.
Common Sizing Mistakes
- Using the microphone weight alone: The shock mount, pop filter, cable, and adapters all add load.
- Ignoring extension: A capacity rating may apply near the clamp, while a fully extended arm has more leverage and may sag.
- Buying the longest arm available: Extra reach can reduce stability and make the microphone harder to position.
- Forgetting desk thickness: A clamp that is too small or too large cannot distribute pressure correctly.
- Mounting on a weak surface: Hollow desks, glass, thin shelves, and damaged particleboard may flex even when the arm itself is strong.
- Failing to check thread compatibility: Microphone mounts may use different thread sizes, so an adapter can be required.
- Leaving no movement clearance: An arm that fits at one angle may strike your monitor when folded or repositioned.
FAQ
How much weight capacity does a Blue Yeti boom arm need?
Plan on at least 2 pounds (0.9 kg) of capacity for the microphone and normal accessories. A 2.5- to 3-pound (1.1- to 1.4 kg) rating gives a more comfortable margin, especially when using a shock mount, pop filter, and a fully extended arm.
Is a 1-pound-rated boom arm enough for a microphone?
It may work for a lightweight microphone without accessories, but it leaves little room for a cable, pop filter, or shock mount. A 1-pound rating is best reserved for compact microphones positioned close to the clamp. For general use, choose at least 2 pounds.
Does a longer boom arm need a higher weight rating?
Usually, yes. A longer arm creates more leverage, even when the microphone’s actual weight stays the same. If you need 28 inches (71.1 cm) or more of reach, choose a sturdier arm and keep at least a 25% to 50% capacity margin.
What boom arm size is best for a small desk?
A compact or low-profile arm measuring about 12 to 20 inches (30.5 to 50.8 cm) is generally the best fit. Choose 2 pounds (0.9 kg) of capacity for a typical USB microphone, then confirm the clamp fits your desktop and the folded arm clears your monitor and wall.


