Key takeaways
- Measuring from the stand instead of the capsule: The useful measurement is mouth to sound-entry point, not mouth to the nearest edge of the mount.
- Placing the microphone too far away: Distances over 8 inches often capture more room sound and make the voice less consistent, particularly in untreated rooms.
- Pointing directly at the lips: Straight-on placement increases plosive risk. A modest 20- to 45-degree angle is usually enough.
- Ignoring proximity effect: Many directional dynamic microphones become noticeably bassier within a few inches. If the voice sounds boomy, move back 1 to 2 inches before applying equalization.
- Buying an arm with no capacity margin: A mount rated exactly for the microphone may sag after adding a shock mount, windscreen, or cable. Leave at least 0.5 to 1 pound (0.2 to 0.45 kg) of spare capacity.
- Choosing accessories by appearance: Clear display stands, small organizers, or clipper holders may help store accessories, but they are not substitutes for a weighted microphone base or correctly sized arm clamp.
- Blocking the camera or monitor: A microphone that sounds good but sits across your face is not a practical video setup. Shift it 20 to 45 degrees to the side or use a low-profile arm.
What's inside
Getting a dynamic microphone to sound full and controlled is less about buying the largest model and more about setting the correct distance, angle, and working height. The right dynamic mic distance to mouth placement dimension setup keeps your voice clear while limiting room echo, plosives, handling noise, and volume changes. This guide covers practical measurements for podcasting, streaming, singing, voice-over, meetings, and casual home recording.
The Short Answer
Start with the microphone capsule approximately 2 to 4 inches (5 to 10 cm) from your mouth. For a close, intimate broadcast sound, use 2 to 3 inches. For singing, louder speech, or a less bass-heavy tone, move back to 4 to 6 inches (10 to 15 cm). Measure from the front of the microphone grille—not from the rear housing or the stand—to the nearest point of your mouth.
As an Amazon Associate we earn from qualifying purchases at no extra cost to you. Product prices and availability are accurate as of the date shown and are subject to change.


Position the microphone slightly to one side, usually 20 to 45 degrees off-center, rather than pointing directly at your lips. Keep the capsule level with your mouth or 1 to 2 inches above it, angled down gently. This placement reduces bursts of air from P, B, and T sounds without requiring excessive distance.
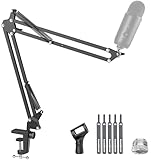
Reserve at least 8 to 12 inches (20 to 30 cm) of clearance behind the microphone if possible. Dynamic microphones reject sound from the rear, but a wall, window, or hard desktop can still create reflections. A boom arm that extends 18 to 30 inches (46 to 76 cm) gives most users enough adjustment range for a comfortable seated setup.
Standard Sizes
Use the following dimensions as starting points. Exact results vary by microphone design, voice volume, room acoustics, and whether you use a foam windscreen or pop filter.
| Setup measurement | Inches | Centimeters | Best use |
|---|---|---|---|
| Mouth to microphone capsule | 2–4 in | 5–10 cm | Everyday speech, podcasting, streaming |
| Close vocal position | 2–3 in | 5–8 cm | Warm, intimate voice with strong proximity effect |
| Open vocal position | 4–6 in | 10–15 cm | Singing, loud speech, brighter and less bass-heavy sound |
| Microphone height relative to mouth | 0–2 in above | 0–5 cm above | Comfortable seated or standing speech |
| Off-axis angle | 20–45 degrees | 20–45 degrees | Reducing plosives and harsh consonants |
| Desk-to-mouth height, seated | 24–30 in | 61–76 cm | Typical desk and chair arrangement |
| Desk boom arm reach | 18–30 in | 46–76 cm | Bringing the microphone over a keyboard or monitor |
| Pop filter or windscreen gap | 1–2 in | 2.5–5 cm | Extra plosive control |
| Recommended rear clearance | 8–12 in | 20–30 cm | Reducing reflections from walls and hard surfaces |
Most handheld and broadcast-style dynamic microphones are approximately 6.5 to 8.5 inches (16.5 to 21.6 cm) long and about 1.5 to 2 inches (3.8 to 5.1 cm) wide. Confirm the product dimensions before choosing a shock mount or clamp. A microphone, arm, mount, cable, and small accessories commonly weigh 2 to 5 pounds (0.9 to 2.3 kg) altogether, so check that the arm’s load rating exceeds your actual equipment weight.
How to Measure Your Space
- Measure your seated mouth height. Sit in your normal working chair with your back supported. Measure from the desktop to the center of your mouth. A typical result is 24 to 30 inches, but monitor height, chair size, and posture can change it.
- Mark the preferred mouth distance. Use a ruler or tape measure to mark 3 inches from your mouth toward the microphone. This is a dependable starting point for spoken audio.
- Check the microphone’s front. Many end-address microphones receive sound through the grille at the narrow end, while side-address models receive sound through the side. Place the correct capsule area at the measured distance.
- Measure the arm’s reach. Measure from the proposed clamp location to the point 3 to 4 inches in front of your mouth. Add 6 to 10 inches for the microphone body and adjustment clearance. Choose an arm with at least 2 inches of spare reach.
- Allow room for movement. Keep 2 to 4 inches of extra space around the microphone so you can sit down, adjust headphones, or move a notebook without striking the grille.
- Check clamp depth and desk thickness. Many desk clamps fit surfaces approximately 0.75 to 2 inches thick. Measure the underside of the desk and avoid placing the clamp over cable channels, drawers, or fragile trim.
- Set the cable path. Leave at least 6 inches of cable slack at each moving joint. Route the cable along the arm with hook-and-loop ties, but do not tighten it enough to restrict movement.
- Test at speaking volume. Record 30 seconds at 2, 4, and 6 inches. Choose the distance that gives consistent volume without excessive bass, popping, or room sound. Do not judge placement only while listening to your own voice live.
By Room or Use Case
Podcasting and Streaming
Use a 2 to 4 inch mouth-to-capsule distance with the microphone slightly off-axis. A low-profile boom arm is usually easier than a floor stand because it keeps the base off the desk. Position the arm from the side rather than directly in front of the monitor. This leaves approximately 12 to 18 inches of keyboard and mouse space clear.
Home Office Meetings
For video calls, place the dynamic microphone 4 to 6 inches from your mouth if the frame allows it. Keep it 20 to 45 degrees off-axis and just below the lower edge of your camera view. A compact desktop stand may be adequate, but it needs a footprint of roughly 4 to 6 inches wide and enough weight to prevent tipping. Mute or disable 48-volt phantom power unless your specific microphone or active accessory requires it.
Singing and Voice-Over
Start at 4 to 6 inches for singing and 3 to 5 inches for voice-over. Move back slightly on loud notes instead of changing gain dramatically. A pop filter positioned 1 to 2 inches in front of the microphone provides a repeatable visual distance marker. Leave at least 2 feet (61 cm) between your back and the nearest hard wall when possible, especially in a small room.
Small Bedroom or Shared Room
Close placement is useful when the room is untreated. Keep the microphone 2 to 3 inches from your mouth and speak across the capsule rather than directly into it. Soft furnishings, curtains, and a bookcase can reduce reflections, while a bare wall or glass desk may make the recording sound sharper. A floor stand can save desk space, but make sure its legs occupy at least a 12-inch (30 cm) diameter area.
Standing Presentations
Set the capsule at mouth height or up to 2 inches above it. A stand should adjust to approximately 48 to 72 inches (122 to 183 cm), depending on the speaker. Keep the microphone 4 to 8 inches away if you need to turn your head frequently. The farther distance requires more room control and may require additional gain, so test for background noise before presenting.
Common Sizing Mistakes
- Measuring from the stand instead of the capsule: The useful measurement is mouth to sound-entry point, not mouth to the nearest edge of the mount.
- Placing the microphone too far away: Distances over 8 inches often capture more room sound and make the voice less consistent, particularly in untreated rooms.
- Pointing directly at the lips: Straight-on placement increases plosive risk. A modest 20- to 45-degree angle is usually enough.
- Ignoring proximity effect: Many directional dynamic microphones become noticeably bassier within a few inches. If the voice sounds boomy, move back 1 to 2 inches before applying equalization.
- Buying an arm with no capacity margin: A mount rated exactly for the microphone may sag after adding a shock mount, windscreen, or cable. Leave at least 0.5 to 1 pound (0.2 to 0.45 kg) of spare capacity.
- Choosing accessories by appearance: Clear display stands, small organizers, or clipper holders may help store accessories, but they are not substitutes for a weighted microphone base or correctly sized arm clamp.
- Blocking the camera or monitor: A microphone that sounds good but sits across your face is not a practical video setup. Shift it 20 to 45 degrees to the side or use a low-profile arm.
FAQ
How far should a dynamic microphone be from my mouth?
Begin at 2 to 4 inches (5 to 10 cm). Use 2 to 3 inches for a close broadcast tone and 4 to 6 inches for louder speech, singing, or a more natural sound. Adjust while recording rather than relying only on live monitoring.
Should a dynamic microphone point directly at my mouth?
Usually no. Aim it slightly across your mouth at approximately 20 to 45 degrees. This reduces direct air blasts and can soften harsh consonants while preserving clarity.
Does a dynamic microphone need phantom power?
A conventional passive dynamic microphone normally does not need 48-volt phantom power. Turn phantom power off unless the manufacturer specifically says it is required for an active inline device, preamp, or special microphone design.
What is the best setup size for a small desk?
Use a side-mounted boom arm with 18 to 24 inches (46 to 61 cm) of reach, a 2- to 4-inch mouth distance, and a microphone body positioned just outside the camera frame. Allow a clamp area about 2 to 3 inches wide and keep at least 6 inches of cable slack. These dimensions suit most compact home-office and 2026 streaming setups.