Key takeaways
- Most gaming chairs assemble in the same order: attach the casters to the five-spoke base, press the gas lift into the base.
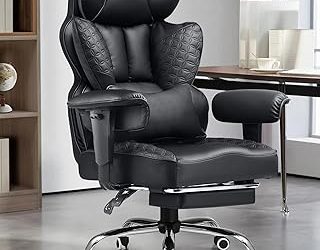
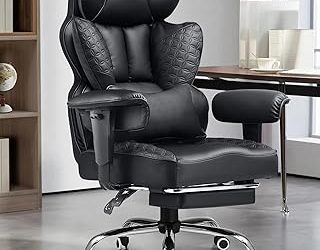
Most gaming chairs assemble in the same order: attach the casters to the five-spoke base, press the gas lift into the base, mount the seat plate to the seat, fasten the backrest, add the armrests and finish with the covers and cushions. Plan on about thirty to sixty minutes and a clear patch of floor, and the job is straightforward with the supplied tools and a second pair of hands for the heavy lifting.
This guide is for anyone staring at a flat box of parts and wondering where to begin. It covers what to unpack first, the order that avoids rework, the mistakes that cause wobble or squeaks, and how to confirm that the chair is safe to sit in. Wherever the manual in your box differs from the general sequence here, follow the manual, since models vary and the printed steps are written for that specific chair, whether you are building one in 2026 or moving house with an older one.
Prepare the Workspace and Check the Parts
Open the box on a carpet or a spread blanket so that nothing scratches the floor. Lay out every part and compare it against the parts list in the manual. Sort screws and bolts by size into a small tray or cup. A missing bolt is far easier to report before you start than halfway through a build.
Keep the packaging until the chair is built and working. If you find a bent part or a missing piece, you will want the original box for a return or a replacement request. A medium Phillips screwdriver and the supplied hex key handle most assemblies, and a second person helps with the final lift.
Assembly Steps in Order
Build the Base and Casters
Press each caster firmly into the sockets of the five-spoke base until it seats. Most are push-fit, so a firm press, not a hammer, is correct. Then drop the gas lift cylinder into the center hole, narrow end down. It should sit snugly; do not pull it back out, since the taper locks it in place.
Attach the Seat Plate and Mount the Seat
Fit the tilt mechanism to the underside of the seat with the supplied bolts, checking that the lever sits on the side the manual specifies. Tighten the bolts partway first, then fully once all are started, working in a crisscross pattern. This keeps the plate flat and avoids a rocking seat.
Fasten the Backrest
Line up the backrest brackets with the mounting points on the seat or side bars, and start the bolts by hand. Because the backrest is tall and awkward, have a second person hold it steady. Tighten the bolts evenly on both sides so that the backrest sits straight, and confirm that any recline slot is facing the correct way.
Add Armrests, Covers and Cushions
Fit the armrests to the mounting holes under the seat and tighten them firmly. Snap on any side covers, then attach the neck pillow and lumbar cushion if your chair includes them. Finally, lift the seat assembly onto the gas lift, press down firmly and sit carefully to seat the cone.
Work in a calm order and avoid the temptation to skip ahead. Most assembly problems come from a part fitted backward, and undoing it later means unscrewing several bolts you have already tightened. Pause before each step to compare the picture in the manual with the part in your hands, especially for the tilt mechanism, the armrests and the backrest brackets, which look similar from one side to the other.
Fit and Safety Check After Assembly
| Check | What to look for | If something is wrong |
|---|---|---|
| Casters | All five rolling freely and fully seated | Press in again; replace any cracked wheel |
| Seat plate | No rocking or gaps | Loosen and retighten bolts in a crisscross order |
| Backrest | Straight, no side-to-side play | Check both brackets and bolts |
| Height lever | Raises and lowers the seat smoothly | Check that the gas lift is seated |
| Recline and tilt | Locks and releases cleanly | Confirm the lever position and bolts |
| Armrests | Firm, no wobble | Tighten the fixing screws |
Before You Start Checklist
- Clear a flat floor area at least twice the size of the chair.
- Read the manual from start to finish before touching a bolt.
- Confirm all parts are present, and group screws by size.
- Check the weight rating in the manual and use the chair only within it.
- Arrange for a second person for the backrest and the final lift.
- Keep the box and receipt in case a part needs replacing.
Fixing Common Problems
A squeak after the first week usually points to bolts that loosened as the chair settled; retighten the fixings and add a drop of suitable lubricant on moving joints if the manual allows it. A seat that tilts when you want it fixed often means the tilt lock is not engaged, so check the lever position. If the chair sinks slowly, the gas lift may be faulty or incorrectly seated, and it is best to contact the seller about a replacement instead of continuing to use it.
Never stand on the chair, and be careful when moving it across thresholds, since the casters can catch. Gas lift cylinders hold pressurized gas, so do not cut or drill them. If a part looks damaged, stop using the chair and ask the manufacturer for a replacement.
Setting the Chair Up for Your Body
Assembly is only half the job; adjusting the chair decides whether it is comfortable. Set the seat height so your feet rest flat on the floor with your knees near a right angle. Adjust the armrests so your shoulders stay relaxed and your forearms rest lightly while you hold the controller or mouse.
Next, set the backrest so your lower back is supported, and use the lumbar cushion at the curve of your spine rather than higher up. Recline slightly if you play for long sessions, and lock the tilt at an angle that lets you reach the desk without leaning forward. Take a short break every hour to stand and stretch, whatever chair you use.
Care and Maintenance After Building
Recheck the bolts after a week of use and then every few months, since vibration and weight shifts can loosen them. Wipe the covering with a cloth suited to its material, following the manual, and keep the casters free of hair and dust, which can jam the wheels. If a fabric or leatherette cover starts to peel or crack, that is a covering problem and not an assembly one, so contact the seller instead of trying to repair the structure. Store any spare bolts and the hex key in a labeled bag taped under the seat, where you will find them again. If you have hard flooring, consider a mat to protect it and reduce rolling noise.
Common Mistakes
- Fully tightening every bolt immediately, which leaves parts misaligned.
- Installing the tilt mechanism in the wrong orientation.
- Forcing the gas lift into the base with a hammer or a tool.
- Skipping the manual and assuming that every chair builds the same way.
- Assembling alone and dropping the backrest on the seat.
Related guides
- Hall Effect Vs Potentiometer Controller Sticks Explained
- Low Profile Cpu Coolers For Small Form Factor Pcs
- How To Transfer Nintendo Switch Data To A New Console
Frequently Asked Questions
How long does it take to assemble a gaming chair?
Most buyers need roughly thirty to sixty minutes, depending on the model and how methodically they work. A second person speeds up the heavy steps.
What tools do I need?
The box usually includes a hex key and sometimes a small wrench. A Phillips screwdriver is helpful, and a rubber mallet is not required for most chairs.
Why does my chair wobble after assembly?
Uneven bolt tightening is the usual cause. Loosen the seat plate and backrest bolts slightly, then retighten them evenly in a crisscross sequence.
Can I disassemble the chair to move it?
Often yes, by reversing the steps. Keep the screws in labeled bags, and check the manual to see whether the gas lift can be removed from the base without damage.
FAQ
How long does it take to assemble a gaming chair?
What tools do I need?
Why does my chair wobble after assembly?
Can I disassemble the chair to move it?
More from Amazon
Programs that pair well with the guide above. Offers and eligibility are set by Amazon and may change.
Free shipping on eligible items, Prime Video and more. Eligible new members can start with a free trial.
Start a Prime free trialAd-free music streaming. Eligible new subscribers can start with a free trial.
Try Music Unlimited freeA Prime membership for ages 18-24 with a trial period. Eligibility is set by Amazon.
See Prime for Young AdultsAudiobooks and podcasts to listen to on the go. Eligible new members can start with a free trial.
Try Audible freeAs an Amazon Associate we earn from qualifying purchases.