Key takeaways
- No signal: Confirm that the source output and destination input are compatible, then reseat both XLR connectors until their latches engage. Swap in a known-good cable to isolate the fault.
- Hum or buzz: Move the cable away from power supplies and mains wiring, then test with nearby equipment disconnected one item at a time. This helps distinguish induced interference from a ground loop or a noisy device.
- Crackling when the cable moves: Check for a loose latch, damaged strain relief, or a connector that wiggles. Replace or repair the cable rather than holding a failing connection in place.
- One channel is quiet or missing: Swap left and right cables. If the problem follows the cable, inspect or replace it; if it stays on the same side, check the source, monitor, and settings.
Best Balanced XLR Interconnects for Clean Audio
The best balanced XLR interconnects for most audio systems are flexible, properly shielded cables with a two-conductor twisted pair, reliable metal connectors, and a length matched to the setup—not the most expensive cable on the shelf. For short studio runs, prioritize flexibility and secure connectors; for long runs or electrically noisy spaces, prioritize effective shielding and robust construction.
What matters in an XLR cable
A balanced XLR connection carries the audio signal on two conductors with opposite polarity, plus a shield connected to the connector’s ground. A differential input compares the two signal conductors and rejects noise picked up similarly on both. That rejection depends on the whole connection: cable geometry, shielding, connectors, and the receiving equipment’s balanced input all contribute.
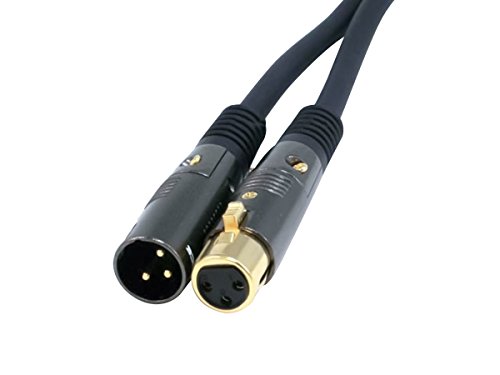
Monoprice XLR Male to XLR Female Cable - 6 Feet - Black, 16AWG, Gold Plated, Microphone & Interconnect - Stage Right Series
Included for 'Best Balanced XLR Interconnects for Clean Audio' because the listing specifies 6 Feet and Black, details this guide uses to compare options.
View on Amazon
Cable Matters 2-Pack Premium XLR to XLR Cable, Microphone Cable, M-F, 6ft
Included for 'Best Balanced XLR Interconnects for Clean Audio' because the listing specifies Microphone Cable and M-F, details this guide uses to compare options.
View on Amazon
Hosa Pro Balanced Interconnect XLR Cable - 5 feet
Included for 'Best Balanced XLR Interconnects for Clean Audio' because the listing specifies 5 feet, details this guide uses to compare options.
View on Amazon![Monoprice 104749 Premier Series XLR Male to XLR Female - 1.5ft - Black - Gold Plated | 16AWG Copper Wire Conductors [Microphone & Interconnect]](https://m.media-amazon.com/images/I/31C4rtHiXHL._SL500_.jpg)
Monoprice 104749 Premier Series XLR Male to XLR Female - 1.5ft - Black - Gold Plated | 16AWG Copper Wire Conductors [Microphone & Interconnect]
Included for 'Best Balanced XLR Interconnects for Clean Audio' because the listing specifies 1.5ft and Black, details this guide uses to compare options.
View on AmazonFor ordinary line-level audio, a well-made cable is unlikely to change tone audibly. Differences that matter in daily use are more often hum or interference in a poor installation, intermittent contacts, stiff cable that pulls on equipment, or a length that makes routing awkward.
How to choose: match the cable to the setup
| Use case | Recommended cable class | Length and construction priorities |
|---|---|---|
| Desktop DAC or interface to powered monitors | Two-conductor balanced cable with braided or foil-and-braid shield | About 1–3 m per channel; flexible jacket and compact connectors |
| Studio rack to control room | Low-capacitance, shielded balanced cable | Measure the route, then add roughly 10–20% slack; choose a durable jacket for repeated handling |
| Live stage or frequent setup changes | Flexible, road-oriented cable with strain relief and serviceable connectors | Use the shortest practical run; select connectors with secure latches and a rugged shell |
| Long run near lighting, power, or computer equipment | Well-shielded twisted pair; consider a balanced line driver or isolator if problems persist | Use only the length needed and route away from power wiring where practical |
| Unbalanced source to balanced input | Purpose-built cable wired for the source and destination | Check the equipment manuals; an XLR plug alone does not make the source balanced |
Conductor material and geometry
Oxygen-free copper (OFC) is common and entirely suitable for line-level audio. Higher-purity copper or silver-plated conductors are not a practical upgrade for most interconnects; the cable’s balanced geometry and sound terminations matter more. A twisted pair helps both conductors encounter similar interference, giving the balanced input a better chance to reject it.
Look for two insulated signal conductors plus a shield, rather than assuming every cable with XLR connectors has the same internal design. For normal studio or home lengths, conductor gauge is mainly a durability and resistance consideration, not a tone-control feature. Very thin conductors can be less robust, while unusually thick cable may be cumbersome to coil and route.
Shielding and noise rejection
A braided shield is mechanically durable and can provide good coverage. Foil shields can offer near-total coverage but may be less suited to repeated flexing on their own; a combination of foil and braid can balance coverage and durability. The shield helps intercept interference, while the twisted pair and balanced input provide common-mode noise rejection. Neither feature can compensate fully for a defective cable, poor grounding, or an unbalanced input.
If you hear hum, do not assume a more expensive cable is the fix. First separate audio cables from power cords, test one cable at a time, and check whether the noise changes when connected equipment is powered from the same properly grounded outlet. Never remove a mains safety ground to cure hum. Persistent ground-loop problems may call for a correctly specified audio isolator or a system-level grounding fix.
Connectors, flexibility, and length
Choose metal XLR connectors with a positive latch, solid strain relief, and replaceable or serviceable construction if the cable will see frequent use. A connector should fit firmly without wobbling, but it should release without excessive force. Gold plating may resist surface corrosion, but it does not by itself guarantee better sound or a more reliable connector.
Flexibility affects more than convenience: a stiff cable can tug on a desktop interface, crowd a rack, or transmit movement to a microphone stand. For a permanent installation, a thicker jacket may be worthwhile; for a compact desk, a lighter, softer cable is often easier to manage. Avoid coiling a cable tightly around a power supply or binding it under tension.
Buy the shortest length that reaches comfortably, with enough slack to move equipment or service the rack. Extra length does not automatically reduce audio quality, but it adds clutter and can make routing near interference sources harder. In a typical balanced line-level setup, a few extra metres are usually less important than sound routing and good connections.
A practical length and cost check
Suppose a desk-to-monitor route measures 1.6 m along the path the cable must follow. Adding about 20% slack gives 1.6 × 1.2 = 1.92 m, so a 2 m cable is a sensible fit. If the monitor may move during cleaning or repositioning, choose the next practical length rather than pulling a 2 m cable taut. For two monitors, buy a matched pair in the required length; matching is useful for tidiness, not because the left and right cables need special sonic pairing.
Basic, correctly wired cables are commonly available in the low tens of dollars per cable, while heavier-duty or premium-connector options often fall in a general range of about $20–$60, depending on length and construction. Custom installation cable and specialty assemblies can cost more. Spending extra makes most sense when it buys a useful feature—repairable connectors, tougher strain relief, a specific length, or better handling—not a promise of improved sound from a system that already has a quiet, intact connection.
Common connection checks
- No signal: Confirm that the source output and destination input are compatible, then reseat both XLR connectors until their latches engage. Swap in a known-good cable to isolate the fault.
- Hum or buzz: Move the cable away from power supplies and mains wiring, then test with nearby equipment disconnected one item at a time. This helps distinguish induced interference from a ground loop or a noisy device.
- Crackling when the cable moves: Check for a loose latch, damaged strain relief, or a connector that wiggles. Replace or repair the cable rather than holding a failing connection in place.
- One channel is quiet or missing: Swap left and right cables. If the problem follows the cable, inspect or replace it; if it stays on the same side, check the source, monitor, and settings.
Bottom line
For a home studio or gaming audio setup with balanced outputs, choose a flexible two-conductor twisted-pair cable, a dependable shield, secure metal XLR connectors, and a length that leaves modest slack. For touring or frequent handling, favor durability and repairability; for a quiet fixed installation, prioritize correct wiring and clean routing. A well-chosen standard cable will serve most balanced line-level systems without paying extra for claims that do not address a real need.